Archive for easy

Recipes: Quiche, a Basic How-To

Posted in Recipes with tags , , , , , , , , , , , , , , , , on January 2, 2014 by KarenElizabeth

When I was in university, I made my first vegetarian friends — and I had no idea how to feed them.  My high-school girlfriend’s brief flirtation with vegetarianism had consisted mostly of grocery-store-brand veggie lasagna, vegetarian chili-cheese fries at the cafeteria, and eating a lot of raw veggies & dip.  I’d never had to cook an entrée that didn’t include meat, before, and wasn’t entirely sure where to begin.

A search online for vegetarian recipe ideas led me to a food I’d never tried before:  quiche.  I figured that something which looked essentially like an omelette in a pie crust couldn’t possibly be half bad, and whipped up a quick version with broccoli, mushrooms, and three kinds of cheese.  It was a success, and quiche entered my cooking arsenal as an easy, quick, and crowd-pleasing piece of comfort food.

quiche

These days, while quiche remains an easy default for vegetarian-friendly meals, it’s something I make more often as a portable lunch-option for work, or as something I can quickly reheat when I’m too busy to cook for a few days.  It’s also a great way of using up leftovers, since you can throw pretty much anything into a quiche and it’ll come out tasting pretty good.  I usually do, in fact, use meat in my quiches — today’s version includes pork sausage — but they’re an incredibly flexible food that you can easily tailor to your particular desires.


The Crust

The most labour-intensive part of a quiche is the crust.  I generally use my basic pie crust recipe as the starting point, but since a quiche doesn’t require a top crust I’ll just whip up a half-sized batch.

Cut a half-cup of vegetable shortening into 1-1/3 cups all-purpose flour and a pinch of salt, until you’ve got a crumbly mixture with no big clumps of shortening.  At this point, since quiche is a savoury dish, you may want to add a few herbs — I like to toss in a sprinkling of dried Italian herbs for visual interest and a bit of a flavour-hit in the crust.  Sprinkle cold water in, a tablespoon at a time, until the dough just comes together into a slightly-crumbly ball.  Refrigerate the dough for 15 minutes or so before rolling out into the bottom of your pie dish (or a round cake pan will do, if you want a deeper quiche with a more straight up-and-down edge — a springform pan will allow you to make a deep-dish quiche without the difficulty of removing it at the end).

Alternatively, you can either use a store-bought crust, or puff pastry.  Either is perfectly acceptable (although everyone should really make a scratch-made crust at some point in their life).


The Filling

As I’ve already mentioned, you can put pretty much anything you like into a quiche.  Meat should be pre-cooked (for today’s quiche, I browned the sausage & some onions in a frying pan for the filling), but vegetables can be either cooked or raw — I tend to prefer raw veggies, since they retain more of their individual flavour and texture within the cooked quiche.  Frozen veggies are perfectly acceptable, here — just give them a rinse to get rid of the “freezer taste”.  Dark green veggies like broccoli, asparagus, and spinach are classic quiche ingredients, but don’t feel limited; use whatever you like.

Leftovers are a great option for quiche, so this is the perfect place to use up the last bits from your roast or chicken dinner.

Depending on the texture you prefer, you can use large or small pieces in your filling.  I like the texture & flavour variations provided by using larger pieces of veggies, but it’s entirely up to you.  Smaller bits will give a more uniform flavour throughout the dish.

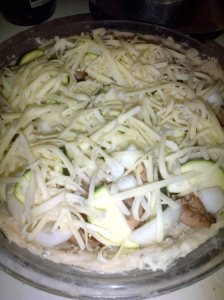
quiche filling

Where I differ from many classic quiche recipes is that I like there to be a LOT of stuff in my quiche.  While custard is delicious, I prefer to add just barely enough egg & cream to hold the whole thing together, to make a more hearty meal.  So as you can see in the photo, I fill my dish right up.  Meat, veggies, and plenty of cheese, with just a few little spaces in-between for the egg to fill.  Putting the majority of the cheese on top (use any kind you like; my quiche today has a combination of Parmesan and sharp Cheddar) makes for a nice toasted, crispy top that both looks and tastes delightful.


The Custard

The defining ingredient of quiche is, of course, the custard.  Thoroughly beating the eggs is important to getting a nice, fluffy texture on your finished product.  For my 9″ pie pan, I use 3 eggs and about a cup of cream (5-10%, although whole milk will do if you’re concerned about fat content).  Add your herbs & spices to your custard — salt, pepper, garlic powder, and paprika (be generous with the paprika) are my usual “basic” mix, and then I’ll add other spices to compliment whatever filling I’m using.  Chili spice or cayenne for a spicier meal, parsley & sage to go with chicken, rosemary with beef, dill & thyme with fish — or, like today, a generous scoop of curry powder to compliment my pork sausage.  Make sure the herbs & spices are thoroughly mixed in, then pour your custard mix slowly over top of the filling in the pie shell.  A few light taps on the side of the pie pan will make sure that the custard has filled up all the holes between the filling.

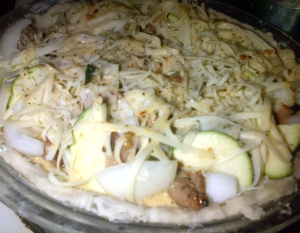
quiche before baking

Note that your quiche should not look particularly “full” of custard at this point.  It will puff up during cooking — if the pie pan is full to the brim, you’ll get spillover as things cook.  You can see in the pictures that mine looks quite “shy” before going in the oven, but once things are cooked the eggs have puffed up to fill the remaining space.

Cooking, Serving, Storing, and Re-Heating

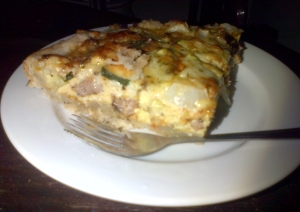
In an oven heated to 375 Fahrenheit, bake your quiche for about 40 minutes (until the crust is golden-brown).  Once you take it out, let it sit for 5 minutes or so before serving — this will let the custard solidify a bit more, and make it easier to slice & serve.

quiche toasty cheese

I like my quiche with a bit of hot sauce on top, or occasionally a drizzle of balsamic vinegar.  If you’re feeling decadent, you can drizzle on a bit of hollandaise.  A 9″ pie pan makes about 4 servings.  A bit of salad on the side rounds out the meal, but certainly isn’t necessary.

Quiche will keep wonderfully for 3-4 days in the fridge — wrap tightly with plastic wrap or aluminum foil, or store in an airtight container, to prevent it from drying out.  Or you can divide it into portions & freeze for 2-3 months.

Reheating is best done in an oven or toaster oven, to maintain the crisp & flaky crust.  If you’ve frozen your quiche, reheat it directly from frozen, don’t thaw it out first.  If you’ve just been keeping it in the fridge, it should only take about 10 minutes to be heated through & ready to eat.

Microwaving is faster, but your crust will get soggy.  3-5 minutes should do, depending on your particular microwave.

You can also eat quiche without reheating, which is often what I’ll do at lunch time.
Recipes: Creamy Broccoli & Cheddar Soup

Posted in Recipes with tags , , , , , , , , , on March 17, 2013 by KarenElizabeth

This soup is a favourite food of mine — and it’s incredibly easy to make.  If you’re intimidated by cream soups, or just don’t tend to like the commercially available ones (I know I don’t — I find they’re always way too thick & the texture is off-putting), this is a great place to start.  You can use this same basic method to make any sort of cream soup — cream of mushroom, cream of celery, whatever catches your fancy.

You can also make this soup lactose-free and vegan-friendly by omitting the cream & cheese — it’s a delicious soup without those things, too.

Broccoli_bunches

Total prep time is about an hour and a half, although most of that is just cooking.  The actual work involved takes about 10-15 minutes.

Ingredients

  • 1 bunch broccoli, roughly chopped
  • 1 cup half and half cream (can be omitted or replaced with soy milk for lactose-free)
  • 3 cups stock (chicken or vegetable)
  • 3 cups water
  • 1 onion, diced
  • 3 or 4 cloves garlic, finely minced
  • a few tablespoons butter or margarine
  • 1/2 cup flour (or a flour substitute like corn starch, if going for gluten-free)
  • salt & pepper to taste
  • a pinch of paprika
  • cheddar or other cheese (I happen to like mixing 1/2 and 1/2 cheddar and swiss) (can be omitted if desired)

Prep

Start by pre-heating a large pot and melting your butter or margarine over medium-high heat.  Add your diced onion & garlic, and sautee until you start getting some nice brown colour going on (should just take a couple of minutes).  At this point, add your flour — this will absorb the butter and the liquid from the onions to make a roux, which will thicken your soup.  Keep stirring until all the liquid is absorbed, so that the flour doesn’t burn & stick to the bottom of the pot.

Add your stock & 3 cups of water to the pot, as well as your broccoli.  You can add a bit more water if the broccoli is not completely submerged.  Bring everything to a boil, and then turn down the heat to a very low level and let it simmer until the broccoli is thoroughly cooked & quite soft.

At this point you want to blend your soup to crush up the broccoli.  If you have an immersion blender, this is the perfect tool — or if not, you can pour your soup into a blender or food processor, and then return it to the pot once blended.  I like to only blend a little, to leave some chunks of broccoli and give the soup a better texture, but you can make it as creamy as you wish.

Once everything is blended together, add your cream & spices.  Careful with the salt, especially if you used a commercially made stock as your base — go lightly, and you can always add more later.  Remember that you’ll be adding cheese to this, and cheese has salt in it too.  Pepper, on the other hand, I encourage using a heavy hand with.  Paprika rounds out the flavour and compliments the garlic, as well as adding a little pop of colour (you can also sprinkle the bowl with paprika before serving, to add extra visual interest).

Return the soup to a simmer, and leave for 20 minutes or longer (to thoroughly merge all of the flavours).

Grated cheese should be added to the bowl right before serving — this means that the cheese will still be visible when the bowl hits the table, and also means that you don’t end up with cheesey goo stuck permanently to the bottom of your pot (makes for easier washing up).

And that’s all there is to it!

Changing it Up

This soup is super easy, so don’t be afraid to change it up with your own touches and ingredients.  Switch up the vegetables, or add meat to the pot (after you’re done blending things) for a heartier meal — I like adding bits of chicken or sausage (cooked in a frying pan with a bit of oil to give them some nice browned edges), or you can’t go wrong with bacon.  Try different types of cheese to add a different flavour (smoked gouda is delicious, or a creamy goat cheese for richness).  Try adding curry when you’re making your roux (curry likes to be cooked with oil, or it tastes “raw”), or a blend of Italian spices when you add your cream.  Or add some roasted tomatoes and/or red peppers to give it a really different flavour and colour.  Be adventurous!  And share your experimentations in the comments.

All in One Pot: Pasta with From-Scratch Cream Sauce

Posted in Recipes with tags , , , , , , , , , on February 1, 2011 by KarenElizabeth

My most hated of all household chores isn’t cleaning the bathroom.  It’s not scrubbing the floors.  It’s not washing the ceilings, or doing the laundry, or any of the other things which many people will state when they complain about housework.

No, my least favourite household chore is the dishes.

For someone who cooks almost every single meal from scratch, this can quickly grow to become a problem.  Without the disposable containers of take-out and pre-packaged meals, it’s hard to make anything that doesn’t create at least a small pile of dishes to be done.  A pot for this, a pan for that, a bowl and a set of tongs and a spatula … and if, like me, you’re prone to letting the dishes go for a couple of days before rolling up your sleeves and getting to it, it can become a pretty daunting task.

It’s at times like this when I am thankful for meals that can be made using only one pot, one spoon, a cutting board, and the dish you serve it in (if you’re feeling especially lazy, you can even eat it right out of the pot and save yourself one more dish).  But, contrary to popular belief, one-pot meals need not consist of foods like ramen noodles, condensed soups, and Kraft Dinner.  You can make something classy enough that you’d serve it to company (probably *not* right out of the pot, though), and still keep your dishes to a bare minimum.

Tonight’s dinner is a creamy pasta with chicken, carrots, onions and mushrooms, and I’m making enough for 2 servings (mmm, leftovers for lunch tomorrow!).  You can increase the amounts you’re using to make more — none of the measurements are particularly exact.

I began by cooking up a bone-in chicken breast (you can use boneless if you prefer, but bone-in is less expensive to buy).  I put a couple inches of water in the bottom of my pot (about 2 cups worth), added the chicken breast, put the lid on, and simmered until the chicken was thoroughly cooked.  When cooking in water you don’t need to worry about overcooking, because the meat’s not going to dry out on you.  Just keep an eye to make sure the water doesn’t all evaporate away, because you don’t want your meat getting stuck to the bottom of the pot and burnt.

Once the meat is thoroughly cooked, remove it from the pot and set it aside to cool down enough that you can handle it.  While you’re waiting, begin working on the sauce.  Add about a quarter cup of cornstarch to the water still in the pot, and whisk until it’s dissolved.  This will help to absorb any fat from the chicken and keep your sauce from separating, and will also help the sauce to thicken up and become creamy.  Add another cup or so of water, and about a half-cup of half-and-half cream.  Your sauce will be quite thin at this point, but that’s okay — it’s going to simmer down during the cooking, and some will be absorbed by the pasta later.

You can also add some spices at this point — a bay leaf or two, some poultry seasoning, garlic powder, rosemary, black pepper, whatever catches your fancy.  Get creative if you wish; an Indian masala spice blend makes a really nice sauce, or you can use some paprika and chili powder to make a spicy, more colourful dish.  Be a little bit conservative when adding spices here — the sauce will thicken up and the flavours will concentrate during cooking, and you don’t want to accidentally over-spice.  It’s easy to add more later, but can be difficult to compensate for having put in too much.  Definitely don’t add any salt until the end, as it’s very easy to over-salt a dish at this point.

Chop up half of a cooking onion, two small (or one large) carrots, a handful of mushrooms, and your chicken breast (remove the bones and discard them).  Use other vegetables if you would like to, but these things make a nice, balanced mix.  Put it all into the pot, return it to a simmer, and let it cook until the veggies have all softened up.

Once everything is thoroughly cooked, you can add your pasta noodles, as well as any soft items (green onions, kale, etc) that only need a few minutes to cook.  Watch the pot and stir things around occasionally to stop the noodles from sticking to the bottom.  Once the noodles are soft, give the sauce a taste to see if it’s spiced well enough for you.  If it all tastes good, it’s ready to eat!


Make it Gluten-Free!

This same technique works well for cooking rice (or rice noodles), and so is excellent for people who are trying to go gluten-free.  Using gluten-free pasta or rice in place of the normal pasta noodles makes an easy dish, with none of the gluten or wheat products often found in commercially prepared sauces.


Some Other Ideas, and Troubleshooting

You can also do other types of sauce in this same way — try making a tomato sauce by adding half a small can of tomato paste instead of the cream, or try an Asian-inspired sauce with sake or white wine and a tablespoonful of soy sauce — this is especially nice with rice.  You can use other meats in place of the chicken (lean sausage or ground beef works excellently), just avoid fatty cuts as they will make the sauce a bit greasy.

If you find that your sauce is a bit too thin, simmer it a bit longer and/or add a bit more corn starch.  If it’s too thick, just stir in a little more water.

And that’s all there is to it!  A delicious homemade meal, without the big pile of dishes.

Roast Chicken Day 2: Leftover Soup

Posted in Recipes with tags , , , , , , , on September 15, 2010 by KarenElizabeth

Growing up, one of the meals we had periodically was something that my mom called “refrigerator soup”.  As unappetizing as that sounds, it was usually quite delicious — and always a bit different, because as the name suggests, it was primarily designed as a meal that would use up the last bits of whatever was in the fridge.  As an adult, I’ve gained a new appreciation for leftovers, and soup has become a regular comfort-food around my house.

In yesterday’s post I covered the makings of a roast chicken with bread stuffing.  Since roast chicken leaves you with plenty of meat and a chicken carcass left over (excellent for making stock), today naturally became a soup day.  You can make your own stock for soup, or just use store bought to speed things up.  If you’re using store bought stock, you can skip down to the “making the soup” section of this post.

Making the Stock

I briefly outlined this process in yesterday’s post, but I’ll go into more detail here.  Stock is essentially water that has been flavoured by boiling it with other things (usually meat, but you can do veggie stock as well).  Making stock from leftover bones takes much longer than making stock from fresh cuts of meat, but is a great way of stretching the food budget by making use of things that would otherwise just be thrown away.  I like to use the slow-cooker for this purpose, but it can also be done in a stock pot or dutch oven if you’re going to  be home to supervise it (I don’t like leaving the stove on when I’m not home, although others will disagree with me on this point because the heat used is very low).

Preparing stock takes very little effort, but quite a bit of time.  I’ve gotten in the habit of starting stock late in the evening, so that I can leave it simmering overnight and through most of the next morning.  On the stove you’d only need about 4 hours to get a good stock (so it can be started at lunch time and you’ll have soup in time for dinner); in the slow cooker you’ll want to go for 12 or more, so starting the day before is preferable.

Once you’ve cleaned most of the meat from your chicken carcass, place the bones into the slow cooker along with several cloves of garlic or a small onion, herbs (bay leaves, rosemary, thyme, parsley, etc) and some other vegetables (celery and carrots are traditional, but use whatever you like).  Don’t feel as though you have to use the “good” parts of the veggies; carrot skins or the tough ends of broccoli stems are just fine, since you won’t actually be eating these, they’re just there for flavour.  I also like to throw in a dried chili pepper or two and a sprinkling of whole peppercorns, since I’m a fan of spicy.

Once your slow-cooker is about 2/3rds full with various flavours, fill it with water.  I also like to add a little bit (about half a cup) of something acidic, to help in breaking down the connective tissue in the bones and getting all the flavour out.  Wine, vinegar, lemon juice, or tomato sauce all work well.  Cover everything up, set it on low, and go do something else for a while.

Once your stock is prepared, run it through a strainer or use a slotted spoon to remove all of the chunky bits, which can now be thrown away.  If there’s a layer of fat on top of the stock, skim off as much as you can with a spoon or spatula — don’t worry about getting all of it, but you don’t want it to be TOO greasy.

You can use your stock for making soup right away, store it in the fridge for a couple of days, or freeze it — either all in one container to make soup later, or in ice cube trays so that you’ll be able to use a little bit at a time in making sauces, stir fries, etc.  Treat frozen stock cubes the same way you’d treat a bouillon cube when adding them to recipes.

Making the Soup

If you’re doing your soup in a slow-cooker, you’ll want to start 6 to 8 hours before dinner time.  If you’re making it on the stove, you can do it in two.

The most important thing in making soup from scratch is understanding how your ingredients will fall apart.  Things that will retain their shape (veggies, chunks of meat, etc) go in first and spend some time simmering, to blend the flavours.  Things that will fall apart and turn to mush (lentils, rice, potatoes, pasta, etc) don’t go in until the cooking time is nearly finished — during the last hour in the slow-cooker, or during the last half-hour on the stove.

You can use almost anything that’s in your fridge for making your soup: any veggies, any meat.  I’ll go through a very basic chicken and veggie variety, here, but don’t feel at all bound by what I’ve used.

For the meat in my soup, I cut up the remainder of the dark meat from my roast chicken (the white meat I’m saving for sandwiches).  Be careful to remove any bits of gristle and cartilage, since nobody likes getting a bite of that in their soup.

For the veggies, I cut up an onion, some button mushrooms, and some rapini.  The leafy parts of the rapini I’ll throw in towards the end of the cooking time, but the harder stems can go in right away.

I never measure how much of anything I’m putting into a soup.  I just add things until it starts to look good.  What your soup looks like now is pretty similar to what it will look like when finished, so it’s easy to judge by eye how much to put in.

Throw everything in the pot, cover, and simmer on low heat.

When you get to the last little bit of cooking time (the last hour in the slow cooker, or the last half-hour on the stove), it’s time to add the softer ingredients.  Be a little bit cautious with things like lentils and rice, which expand when cooking — it’s easy to add too much.  I stick to adding just a handful or two — less than a cup.  As you get more practiced at making soup, you might want to increase that amount, but it’s better to start with less and then move upwards.  Leafy veggies like the rapini I’m using, or things like spinach, kale, or cilantro, can also get added now:  saving them for the end means that they’ll get wilted down nicely, but won’t get overcooked and slimy.

Cover and let simmer for the remainder of the cooking time, and then serve!  Soup is pretty much a whole meal in one pot, but I usually like to have a slice of bread or some biscuits on the side, just to break up the flavour a little bit.

***NOTE: I never add salt until the very end of the cooking time, just before the soup is going to be served.  It’s hard to tell just how rich your flavours are going to be before the cooking time it finished, and adding salt too early can result in over-salting.  Before you spoon your soup out into bowls, give it a taste and decide whether a dash of salt should be added.

Leftover soup can be stored in the fridge for a few days, or frozen in serving-sized amounts to be re-heated whenever you desire it.  I usually have at least a few servings of soup hiding away in the back of my freezer for days when I just don’t feel like cooking.

Roast Chicken with Bread Stuffing

Posted in Recipes with tags , , , , , on September 14, 2010 by KarenElizabeth

I’ve already covered cooking large cuts of meat, like roast beef and pork, in an earlier post on this blog.  And now that the weather’s finally getting cooler, I’m getting back into the roasting mode.  So tonight’s dinner (and the subject of this post) is roast chicken.

As a note before we begin: this method of roasting works for other birds as well — duck, turkey, goose, pheasant, etc. can all be done up in a very similar way — just remember to account for the different size (a big turkey takes a long time to cook!) and fat content (ducks, for example, are very fatty birds, and the skin must be pricked all over with a knife to allow that fat to drain out during cooking).

The Stuffing

My mom taught me to make this stuffing years ago, when I was still in high school.  She always uses celery and onion as the vegetables, and it’s a good combination.  I like to mix it up a little, largely because I’m not a huge fan of celery for its own sake and I rarely buy the stuff.  In tonight’s stuffing I used rapini (also known as Chinese broccoli or broccoletti) instead, and I’ve also had success in the past using carrots, corn, green beans, kale, bok choy, red peppers, and combinations of the above.  Use whatever veggies appeal to you.  You can also throw in a handful of cooked bacon or sausage, if you’d like to make things extra meaty.

To begin with, chop a small onion and a handful of veggies into approximately 1cm pieces.  You’ll want between 1 and 2 cups of veggies in total, depending on the size of your bird (although you can make an extra large batch of stuffing and bake some of it in a separate pan, if you’ve got stuffing-lovers to please).  Put the veggies into a large saucepan or a medium-sized pot along with 2 to 3 tablespoons of butter or olive oil, on medium heat.  You want the veggies to soften, not brown too much.  If you’re using denser vegetables like carrots, you might want to boil them for a few minutes before putting them into the stuffing, just to make sure they get nice and soft.

While the veggies are cooking, add your herbs and spices.  Salt, pepper, sage, and oregano are pretty much essential, in my books, for getting that proper “stuffing flavour”.  Most herbs will taste good in stuffing, and you can add whatever your favourite flavours are:  rosemary, thyme, basil, parsley, cloves, and garlic are all good choices.  Spice liberally; the bread and milk you’re going to add next will dilute the flavours significantly.

Once the veggies are nice and soft, remove them from the heat.  Now it’s time for the bread.  You’ll want at least as much bread as you have veggies, or as much as two times as much bread.  Use whatever type you have on hand; the flavour won’t much affect the final outcome of the stuffing.  Slightly stale bread or crust pieces are best, as they hold their shape a little bit better and make for a chunkier stuffing.  Tear or cut the bread into small pieces (about 2cm across), and mix these in with the veggies.  The bread will soak up the butter and spices pretty quickly.  Add milk or cream to the mix until the bread just begins to fall apart.  Finally, add one beaten egg to help glue everything together.  And now your stuffing’s ready to go into the bird!

Preparing the Bird

The first step in preparing your bird is selecting a nice one from the store.  Look for air-chilled, NOT water-chilled meat (in many parts of the world water-chilled meat doesn’t meet health code regulations, and there are good reasons for this — frankly, it’s just a bad practice).  Free range is good if you can get it, since these birds will have less fat and higher-quality meat.

Many people advise rinsing your chicken before cooking, but I’ve never liked doing it.  It significantly increases the risk of transferring salmonella or e-coli bacteria to your kitchen surfaces, increases the amount of time that you need to spend handling the raw chicken, and really shouldn’t be necessary unless you managed to drop your chicken in the dirt at some point.  Any bacteria on the chicken will be killed by thorough cooking.

Get all of your ingredients and tools prepared before you pull out the chicken, so that you won’t have to open cupboards or the fridge with dirty raw-chicken hands.  Get the roast pan out, turn the oven on, have a spoon ready to help with the stuffing, and have the twine out for binding up your stuffed bird.

Check inside the cavity of your bird to see if there are any organs in there.  Sometimes the kidneys, liver, heart, and/or neck may be tucked inside the cavity.  You can cook these up and serve them, if you like (I’m not a fan of organ meats, but some people do like them), or just set them aside to be used in making chicken stock later.

Once the cavity is empty, use a spoon or your hands to put as much stuffing inside your bird as possible.  Squish it down to remove air bubbles.  Once the bird is as full as you can possibly get it, tie the legs together to hold everything in.

***NOTE: if you want to make extra stuffing, I suggest cutting off the wings from your chicken and putting those into the baking pan with the extra stuffing.  This allows some of that “chicken flavour” to get into the separate pan.  You can also add a bit of chicken stock to the extra stuffing, to replicate the extra juices that would come from being cooked inside the bird.

Once your bird is stuffed and trussed, sprinkle the skin with a little bit of salt — this will help it to come out nice and crispy.

Cooking the Bird

It’s best to cook your bird at a medium temperature, to ensure that everything gets heated through without the outside getting blackened.  I generally set the oven to about 350 degrees Fahrenheit — at this temperature, a 5lb chicken will take about an hour and forty-five minutes to two hours.

To ensure a nice, crispy skin and good colour, I like to cover the pan for the first hour and a half or so, until the internal temperature of the bird is about 150 degrees (30 degrees short of finished).  At that point I’ll uncover the pan and turn the oven temperature up to 450 degrees.  This last 20-25 minutes of cooking will crisp everything up nicely.

It is absolutely, positively, 100% necessary to use an accurate thermometer to check the doneness of poultry.  The density and packing of your stuffing, the density of the meat, the amount of fat in the bird, and the nature of individual ovens can all cause differences in cooking time, and undercooked chicken can kill you (or at least make for a very unpleasant few days spent getting better acquainted with the toilet).  If you don’t have one, invest in a digital meat thermometer.  Don’t guess, because you don’t want to find this stuff out the hard way.

Carving, Serving, and Leftovers

Carving a chicken (or other bird) isn’t nearly as difficult as it looks.  This is the method I use, although there are other ways out there.  A thoroughly cooked bird should kind of fall apart on its own, and won’t need much help from your knife.

A roast chicken just isn’t complete without gravy.  Combine some of the drippings from your chicken with a roux made from flour or cornstarch and water (or milk, or chicken stock, if you want some extra chickeny-flavour).  I usually add a dash of Worchestershire sauce or soy sauce to deepen the colour of the gravy a bit, since I find the yellowish colour of chicken drippings to be slightly unappetizing.

Pack up leftovers right away and refrigerate them to prevent spoilage.  I like to slice any leftover breast meat up for sandwiches, while dark meat gets chopped into small pieces to go into chicken salad or soup.

Once you’ve served up or packaged and refrigerated all of the meat from your chicken, you can make chicken stock from the bones.  I generally just throw the carcass into my small crock pot with 5 to 6 cups of water, a clove or two of garlic, a couple of bay leaves, and a sprig of rosemary.  Turn it on low and leave it overnight.  In the morning you can pour it through a strainer, and you’ve got homemade chicken stock, all ready to turn into soup or other deliciousness.

And that’s all there is to it!  Almost as easy as roast beef, and a nice inexpensive meal that will feed several hungry mouths.

What’s the Difference between Jelly and Jam?

Posted in Recipes with tags , , , , , , , , , on July 27, 2010 by KarenElizabeth

There are lots of punchlines to the query posted in the title (one of the less rude of them is “you can’t jelly a banana in your ear”), but this post is focused more on the actual question of how one makes home-made jam (or jelly; I’ll cover that, too).

This week’s little project, for me, was homemade cherry jam.  Growing up, my parents had a sour cherry tree in the backyard.  I was the only one out of all the kids in the neighborhood who actually enjoyed eating the cherries straight off the tree (then again, I probably had no taste buds left after eating all the hot chili peppers straight out of the garden).  For most everyone else, the cherry tree was but one ingredient in a multitude of heavily sweetened delights:  cherry pie, cherry cake, cherry tarts, and of course, cherry jam.  I liked the cherry tree so much that I even did a grade 2 science report on the subject (complete with cherry jam-filled cookies for everyone in the class to eat … yeah, even then I’d learned the value of brownie points).

Those days are long gone, now — the cherry tree’s been cut down, I rarely visit home, and I’ve developed an allergy to raw cherries (like many other raw fruits including apples, pears, and peaches, they cause nasty reactions and make my mouth hate me).  But fortunately for me, cherry jam is still on my list of edible eatables (cooking destroys the protein to which I’m allergic).  And there’s a farmer’s market every week just up the street from me where I can purchase pints upon pints of fresh, local deliciousness.  So last weekend I picked up two baskets of cherries: step one in the process of creating enough jam to last all winter.

A Brief History of Fruit Preserves

Jams and jellies have been around for a really long time.  No one’s really sure who first came up with the idea, or how this jam concept was spread (pun intended).  What we do know is that the oldest known cookbook, “The Art of Cooking” by Marcus Gavius Apicius, contains references to fruit preserves.  Apicius, of course, is better known for being a gourmand somewhat akin to the Futurama character Hedonism Bot — his favourite dainty, apparently, was flamingo tongues, and he died a premature death related to his gluttonous habits (although not, as would be poetically judicial, by being pecked to death by tongueless flamingos).  But this has little to do with jam.  My main point here, is, that jams and jellies were already well-known by the time Apicius was writing, during the reign of Tiberius (1st century).

Before the days of refrigeration and easy global transport, jams and jellies served an important purpose besides just making toast un-boring.  Up until the 20th century, preserves were one of the few ways in which people living in non-tropical countries (or those traveling on ships) could get year-round fruit and prevent the onset of diseases like scurvy.  Where I live in Canada, you’re lucky to get fresh fruits for 6 months out of the year (starting out with strawberries in the spring, and carrying on until the last apples are harvested in the fall).  Between November and April, you’re unlikely to see fresh fruit growing anywhere outside of a greenhouse.  So in the days before “grown in California” fruits were common on grocery store shelves, jam was a good way of keeping fruit in your diet all year.

Modern jams are usually made using refined sugar, and the makers of home-made jam will often use shortcuts like boxed fruit pectin to ensure the perfect jam consistency.  In the past, conveniences like this were not available.  Honey and molasses were more likely to be used as sweeteners, and getting enough pectin into your jam often required some trial-and-error.  Many traditional jam recipes include apple peels:  not for flavour, but because the skin of apples contains a very high amount of natural pectin, and this would help make your jam set up nicely.  For budding jam-makers, I suggest starting out with the refined sugar and boxed pectin — it makes the whole process a lot, lot easier.  But once your jamming skills are more refined, please do try making a traditional recipe or two — not so much because they’ll come out better (often they don’t, since it’s hard to predict the amount of pectin in a particular batch of fruit), but because it’s worth seeing how preserves used to be made.  Plus, the old ways are the ways we’ll have to revert to once the zombie apocalypse arrives, so it’s good to have some practice.

Simple Cherry Jam, with Help from Refined Sugar and Boxed Pectin

The recipe for this one is just three ingredients:  4 cups pitted sour cherries, 1 box fruit pectin crystals (don’t substitute liquid pectin; liquid and crystal pectins work differently and require different acid/sugar ratios), and 5 cups of white sugar.  If you can’t get sour cherries, the sweet ones will work, too, but you’ll also need to add about a half cup of lemon juice to make it set up right.  Most boxed pectins come with a recipe guide inside that goes over the recommended ratios:  do check this, because some brands of pectin work a little bit differently from others.  I generally use Certo or Bernardin canning products — they’re widely available and have served me well in the past.

Before you start cooking everything up, though, you need to get your kitchen ready for canning, so let’s take it back a step and go over the sterilization process.  A boiling water canner (basically just a really big pot with a wire rack in it to put your jars on) is a necessity, as are clean (I sterilize mine with vinegar) canning jars (you’ll need enough to hold 6 to 7 cups of jam).  Sterilize all the surfaces in your kitchen, and carefully wash all of the utensils you’ll be using during the canning process:  canning is chemistry, after all, and science works best when you can avoid any outside contamination.  There’s nothing more disappointing than opening up what you thought was a delicious jar of jam, only to find that you’ve got a lovely little mold colony growing in that jar instead.  Well, okay.  There are probably worse things — a baby alien facehugger might jump out and lay eggs inside you, for example — but it’s still a pretty unpleasant thing.

I find that the easiest way to avoid contamination is to wash everything in hot, soapy water, rinse with vinegar, and then put all of the jars and utensils into the boiling water canner.  Fill the canner with water and put it on the stove.  Heat it up until the water is boiling, then remove your utensils.  Leave the jars in there, though:  you’ll want them to be already hot when you pour the freshly cooked jam into them.

Once your kitchen, jars and utensils are as sterile as you can get them, put your 4 cups of pitted cherries into a large saucepan, along with the boxed fruit pectin crystals.  Cook these together, stirring often, until the mixture comes to a boil.  Then add your 5 cups of sugar all at once, mix it in, and return the mixture to a boil.  Stir constantly, and let it boil for one to one-and-a-half minutes.  If the jam gets really foamy while it’s boiling, put in a little bit (only about half a teaspoon) of butter.  Once the cooking time is up, remove the jam from the heat.  Using tongs (you can buy special ones designed for lifting jars, and I suggest using them because it’s WAY easier), remove a jar from the hot water canner.  Use a non-metallic funnel and ladle to fill the jar up with jam.  Leave less than 1/4 inch of space at the top of the jar; you don’t want too much air getting in there or the jam might spoil.  If you see any bubbles of air trapped in the jar, use a non-metallic instrument (like a wooden spoon or a silicone spatula) to pop them, and then top up the jar to full.  Wipe the rim of the jar with a clean cloth (I like to use paper towel, even though they’re not the most environmentally friendly of things, just because it’s easier to ensure that they’re clean).  Then, using tongs again so your fingers don’t contaminate things, put a lid on the jar and screw on the sealing ring until it’s just tight (don’t ream it on there, just tighten it until you get some resistance).  Once the lid is on, immediately return the jar to the boiling water canner so that the jam doesn’t start to cool off on you.  Don’t tilt it!  The lids aren’t on perfectly tight just yet, and you don’t want to spill hot jam on yourself.  Repeat this process with the rest of your jars, until all the jam is canned up.  Then all you have to do is return all of the jars to the boiling water canner, make sure they’re covered by at least an inch of water, and let them boil for 5 to 20 minutes, depending on your altitude above sea level.  This will kill any bacteria that might have survived your rigorous sterilization process.  Turn off the heat, remove the jars from the boiling water canner (again, don’t tilt them!), and let them sit for 24 hours, upright, without being disturbed.  During the cooling process the lids will properly seal themselves, getting vacuumed to the tops of the jars as the jam inside cools down.  After 24 hours, check the lids to make sure they’ve all popped down tightly onto the jars, and then store the finished jam in a cool, dark place until you’re ready to use it.  It’ll keep for at least a year or two (home-canned foods really shouldn’t be kept longer than that, since they don’t contain preservatives of any sort and they may start to ferment).  Once a jar is opened, store it in the fridge.

The Difference Between Jelly and Jam

Jam, as you’ve just seen with the cherry jam, contains little pieces of fruit and the skin of the fruits, in addition to the juice and pulp.  Jelly is made in essentially the same fashion, but with one important extra step:  the fruit is not added whole, but is instead strained so that only the juice is used.  Commercial “jelly bags” are available for straining your fruit, or you can just layer together several pieces of cheesecloth and use those to squeeze all the juices out of your chosen fruit.  Jelly, therefore, comes out clearer-looking and is more homogeneous, while jam is a slightly more chunky affair.  I’ll be making grape jelly later this summer with Kenneth, so I’ll illustrate the differences more fully at that time.  There are also other kinds of fruit preserves besides just the basic two:  marmalade, conserves and freezer jams all have their own peculiar quirks, and I’m sure I’ll get to them all in time.

In the meantime, check out this website for home canning recipes and information.  I tend to like their cookbook best out of all the different ones I’ve read — plus it’s handy that they have all the recipes available for free online.

Recipe: Strawberry Rhubarb Pie with Easy Lattice Crust

Posted in Recipes with tags , , , , , on June 15, 2010 by KarenElizabeth

Pie is one of my favourite things to bake, so it always surprises me a little when I hear that people are afraid to take the plunge and try making their own pies from scratch.  Crust seems to be the main sticking point, and many otherwise capable bakers will succumb to evil temptations and use (shudder) store-bought pie crusts for their creations.  Besides being more expensive than scratch-made pie crusts, store-bought pastry tends to come out heavier and less flaky than the real thing.  It also tends to be loaded up with preservatives and other unnecessary nonsense.

So cast aside your fears, I’ve prepared for you a little step-by-step tutorial on making an easy, delicious pie crust … from scratch.  I even took pictures along the way.

Preparing the Crust

This particular pie crust recipe is the first one that I ever attempted on my own (many, many years ago when I still had to stand on a stool to reach the counter), and I find that it’s a really good standby for most sweet pies.  It’s not my favourite for savoury pies, but it does get the job done in a pinch.  Best of all, it only uses a few ingredients, and takes very few steps to prepare.

To begin, measure out 1 cup vegetable shortening and 2 and 2/3rds cups all purpose flour into a large mixing bowl.  Add to this a pinch of salt, then grab two butterknives.  Holding one knife in each hand, cut repeatedly in opposite directions across the bowl.  Your objective is to cut the shortening into the flour (rather than stirring) — this is what will provide that lovely, flaky texture at the end of things.

You’re finished cutting when the largest chunks of shortening are about pea-sized, and the whole mixture looks crumbly, like so:

At this point it’s time to start adding water.  You want to use cold water, so the shortening doesn’t melt, and add it a tablespoon at a time.  Depending on the temperature and humidity in your kitchen, you’ll probably end up using 6-8 tablespoons of water in total.  Use a fork to lightly “toss” the water in, rather than mushing everything together with a spoon.  You’ve got enough water when the mixture looks kind of raggedy, and there aren’t any dry crumbs floating around the bottom of the bowl, like so:

Now all that’s left to do is to gather your dough into a ball (handle it as little as possible to prevent melting the shortening), cover, and pop it into the refrigerator for 20 minutes or so while you prepare the filling.  Cold pie crust is easier to roll out later.

Preparing the Strawberry Rhubarb Filling

This is my grandmother’s recipe, so none of the measurements are particularly exact.  You can use equal amounts strawberry and rhubarb, or more of one and less of the other.  You can add more or less sugar to get a sweeter or more tart pie.  You can even use different berries besides strawberries (raspberry rhubarb is pretty darn delicious), or simply do a 100% rhubarb pie.  It’s all up to you.

In general, here’s what I use:

  • 4 cups rhubarb, washed and chopped into bite-sized pieces
  • 2 cups strawberries, washed and chopped
  • 3 eggs
  • 1 cup sugar
  • 1/4 cup flour
  • pinch of cinnamon

Mix this all together in a large bowl, and let sit for 5-10 minutes.  This lets some of the juice come out of the fruit, so that you can judge how juicy your pie is going to be.  If you wind up with a lot of juice sloshing around in your mixing bowl, you can leave some of it out when you add the filling to the crust — this will prevent the pie spilling over and making a mess of your oven.

Putting it All Together

Take your dough ball out of the fridge and divide it in half.  Return half to the fridge so that it can stay cool for now.  On a well-floured surface (I like to use my large wooden cutting board, but you can just use the counter if you prefer), roll out the bottom crust of the pie to about 1/4″ thick.  Make sure it’s about 1″ wider than your pie plate on all sides.

Getting your pie crust into the pie plate without tearing it can be a bit of a tricky business.  Having your crust well-chilled before rolling it out definitely helps.  If you rolled your crust out on a cutting board or pastry board, you can simply set your pie plate on top of the crust, upside-down, then flip the whole thing (board and all) right-side-up in one smooth, swift motion.  If you don’t have a large cutting board, the easiest method I’ve found is to use your rolling pin.  Fold the crust gently over top of the rolling pin, then lift it carefully over top of the pie plate.

If, despite your best efforts, you end up with a hole or two in your pie crust, just use a bit of milk or cream to “glue” the crust back together, and press it into place with your fingers.  Once the pie is baked, nobody will be able to tell the difference.

Pour your pie filling into the bottom crust, then retrieve the remaining half of the dough from the fridge.  You can just roll out a top crust the same way you did the bottom, and lift it carefully on top of the pie with your rolling pin, but I prefer to get a little bit fancy here and do a lattice crust.  It’s very little extra effort, and always seems to be appreciated by the pie-eaters (especially those who aren’t aware of just how easy this is).

Before you put your top crust on, you’ll want to cut up about 2tbsp of cold butter or margarine into small chunks, and sprinkle these around the surface of the pie.  This will melt and meld with the filling during baking.

To create a lattice crust, roll the dough out to about 1/4″ thick, at least as wide as the pie plate, then cut into strips 1/2″ to 1″ wide.  Take the two longest strips and lay them across the top of the pie in an X, thusly:

Then add more strips in an over/under pattern.  Leave little gaps between the strips so that your filling will show through and look all pretty.  Here’s a few shots of my lattice crust in progress:

Once you’ve got the whole top of the pie evenly covered, tear off the excess crust from the edges.  You’ll end up with a ragged looking edge:

Which I like to roll up so that it looks more clean and finished:

Finally, I like to brush the crust with a little bit of milk or egg wash, and sprinkle white sugar over the top to create a nice bit of texture and colour.

Pop your pie into a 425 degree oven for about 40 minutes, until the crust turns all nice and goldeny-brown.  Let cool, and enjoy the deliciousness.

Leftover Crust

You’ll probably have a bit of leftover crust after making the lattice top.  Pop this into a freezer bag and it will keep in the freezer for a couple of months.  Small amounts of crust are great for making a quick batch of tarts.  Or you can just roll the crust out to about 1/4″ thick, dip in egg wash, sprinkle with cinnamon and sugar, and make yourself some little cookies (they’re great with coffee).

Quick and Easy Avocado Dip

Posted in Recipes with tags , , , , , , on February 7, 2010 by KarenElizabeth

Want something fast, delicious and brightly coloured to serve to your guests when they arrive?  Don’t want to spend a lot of time making it?  Here’s a simple recipe that takes only a couple of minutes to prepare (and about that long to disappear, if your friends are anything like mine).

The Ingredients:

  • 2 large, ripe avocados
  • 1/4 cup sour cream
  • 1 ripe plum or roma tomato
  • 1 green onion
  • a few leaves of fresh cilantro or parsley
  • sprinkle of garlic powder
  • salt and pepper to taste
  • hot chili flakes (optional)

The Prep:

Open up and scoop out your avocados.  If you’ve never done this before, there’s a pretty thorough tutorial on the subject here.  Put the avocado flesh into a bowl, and mash it up with a fork.  Add the sour cream and mix well until you’ve got a creamy, consistent mixture.

Chop up the tomato and green onion into small chunks.  Roma or plum tomatoes are the best because they have a firm flesh and less juice and seeds, but any tomato will do.  Chop the cilantro leaves quite finely.  Mix this into the avocado and sour cream.

Finally, add your spices.  Just a little bit of garlic powder will do, then add salt and pepper a little bit at a time until it tastes just right to you.  Sprinkle chili flakes over the top if you like — I left that out this time because a few of my friends don’t enjoy spicy foods.

Serve with nacho chips, pita bread, crackers, veggies, or whatever else you’d like to dip.

Other Ideas:

Because this is such a simple recipe, it’s easy to change it up to suit your particular tastes.  Try adding some small salad shrimp or a can of tuna to make a more hearty spread, or preparing this in an oven-safe dish and baking it with cheese on top.  You could even make it in a bread bowl, if you’re feeling adventurous.  Mix it up in a food processor for a really creamy, even-textured spread that could be served on top of chicken.  Or just add your favourite nacho toppings and dig in.  Avocados are really healthy — they’re full of protein and they lower your cholesterol — so this isn’t just a great tasting dip, it’s also really good for you, too.