Archive for gluten free

Gluten-Free, Vegan-Friendly Shortbread Cookie Bars

Posted in Recipes with tags , , , , , , , , , on December 2, 2013 by KarenElizabeth

Dinner parties at my house can be a little bit challenging, as I have a few friends with very restrictive dietary needs.  In most cases, I simply end up preparing a variety of dishes, making sure that each guest has at least something available for them to eat.  But on occasion I’ll try to make a dish that’s for everyone — and that’s where a creation like this one comes in.


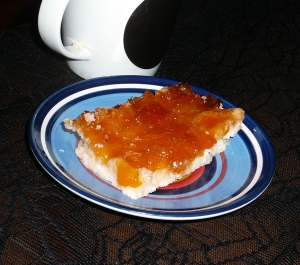
P1070892

It’s gluten-free, so my 2 friends with gluten intolerances can eat it.  It has no coconut, no peanuts, no eggs, no soy, and no dairy.  It’s vegan.  And (this is important), it’s still delicious.


The Ingredients

  • 1 cup vegetable shortening
  • 1 cup sugar
  • 1/2 tsp vanilla extract
  • 1 shot of your favourite liquor or liqueur (I used brandy)
  • 1-1/2 cups rice flour
  • 1/2 cup tapioca starch
  • 1 tsp salt
  • 1/2 tsp baking powder (check to make sure it’s gluten-free; most are)
  • 1/2 cup to 3/4 cup of your favourite type of jam (I used apricot) for topping


The Prep

Preheat your oven to 350 F, and line an 8 x 12 baking pan with parchment paper (this is important because sticky, baked-on jam is very, very annoying to clean up).

In a mixing bowl, cream together the sugar and shortening.

Add the rest of the wet ingredients (except for the jam) & mix well.

Add the dry ingredients (adding in 2 stages is recommended to prevent rice flour from “poofing” everywhere while you stir).  No need to worry about overmixing, since this is gluten-free: just try to get a nice, even texture.  The resulting dough will be very soft and crumbly.

** Note – if you want to make your shortbread into individual cookies or shapes, refrigerate it for 30 minutes to make the dough a little bit easier to work with.  For cookie bars, though, this is unnecessary.

Press the dough into the bottom of your baking pan to create an even layer.

Spread jam over the top.

Bake for 30-40 minutes in the middle of the oven.  The cookie bars are done when you start to get some delicious-looking caramelization at the edges of the jam layer.

When you first take the cookies out of the oven, they will be VERY soft.  Use a butter knife to divide them into bars, then pop the whole thing into the fridge or freezer to cool down before attempting to remove them from the pan.  Once the tapioca flour sets up, they’ll be a nice, slightly-crumbly shortbread texture, but until then they’ll be a bit of a fall-aparty mess.


Variations

To change it up a bit, try adding nuts or a streusel topping on top of the jam layer, or drizzle melted dark chocolate over the finished cookie bars.

To make easy, round cookies instead of bars, try using a muffin tin (or mini-muffin tins) — press a bit of dough into the bottom of each, then top with jam.  Paper muffin-liners will help with preventing any sticking.

To make a thicker, layered bar, try using an 8 x 8 pan instead of an 8 x 12, and divide the dough in half.  Press half into the bottom, top with jam, then add the other half of the dough, and  top with more jam.  Increase the cooking time by a few minutes to ensure even cooking.
Recipes: Creamy Broccoli & Cheddar Soup

Posted in Recipes with tags , , , , , , , , , on March 17, 2013 by KarenElizabeth

This soup is a favourite food of mine — and it’s incredibly easy to make.  If you’re intimidated by cream soups, or just don’t tend to like the commercially available ones (I know I don’t — I find they’re always way too thick & the texture is off-putting), this is a great place to start.  You can use this same basic method to make any sort of cream soup — cream of mushroom, cream of celery, whatever catches your fancy.

You can also make this soup lactose-free and vegan-friendly by omitting the cream & cheese — it’s a delicious soup without those things, too.

Broccoli_bunches

Total prep time is about an hour and a half, although most of that is just cooking.  The actual work involved takes about 10-15 minutes.

Ingredients

  • 1 bunch broccoli, roughly chopped
  • 1 cup half and half cream (can be omitted or replaced with soy milk for lactose-free)
  • 3 cups stock (chicken or vegetable)
  • 3 cups water
  • 1 onion, diced
  • 3 or 4 cloves garlic, finely minced
  • a few tablespoons butter or margarine
  • 1/2 cup flour (or a flour substitute like corn starch, if going for gluten-free)
  • salt & pepper to taste
  • a pinch of paprika
  • cheddar or other cheese (I happen to like mixing 1/2 and 1/2 cheddar and swiss) (can be omitted if desired)

Prep

Start by pre-heating a large pot and melting your butter or margarine over medium-high heat.  Add your diced onion & garlic, and sautee until you start getting some nice brown colour going on (should just take a couple of minutes).  At this point, add your flour — this will absorb the butter and the liquid from the onions to make a roux, which will thicken your soup.  Keep stirring until all the liquid is absorbed, so that the flour doesn’t burn & stick to the bottom of the pot.

Add your stock & 3 cups of water to the pot, as well as your broccoli.  You can add a bit more water if the broccoli is not completely submerged.  Bring everything to a boil, and then turn down the heat to a very low level and let it simmer until the broccoli is thoroughly cooked & quite soft.

At this point you want to blend your soup to crush up the broccoli.  If you have an immersion blender, this is the perfect tool — or if not, you can pour your soup into a blender or food processor, and then return it to the pot once blended.  I like to only blend a little, to leave some chunks of broccoli and give the soup a better texture, but you can make it as creamy as you wish.

Once everything is blended together, add your cream & spices.  Careful with the salt, especially if you used a commercially made stock as your base — go lightly, and you can always add more later.  Remember that you’ll be adding cheese to this, and cheese has salt in it too.  Pepper, on the other hand, I encourage using a heavy hand with.  Paprika rounds out the flavour and compliments the garlic, as well as adding a little pop of colour (you can also sprinkle the bowl with paprika before serving, to add extra visual interest).

Return the soup to a simmer, and leave for 20 minutes or longer (to thoroughly merge all of the flavours).

Grated cheese should be added to the bowl right before serving — this means that the cheese will still be visible when the bowl hits the table, and also means that you don’t end up with cheesey goo stuck permanently to the bottom of your pot (makes for easier washing up).

And that’s all there is to it!

Changing it Up

This soup is super easy, so don’t be afraid to change it up with your own touches and ingredients.  Switch up the vegetables, or add meat to the pot (after you’re done blending things) for a heartier meal — I like adding bits of chicken or sausage (cooked in a frying pan with a bit of oil to give them some nice browned edges), or you can’t go wrong with bacon.  Try different types of cheese to add a different flavour (smoked gouda is delicious, or a creamy goat cheese for richness).  Try adding curry when you’re making your roux (curry likes to be cooked with oil, or it tastes “raw”), or a blend of Italian spices when you add your cream.  Or add some roasted tomatoes and/or red peppers to give it a really different flavour and colour.  Be adventurous!  And share your experimentations in the comments.

All in One Pot: Pasta with From-Scratch Cream Sauce

Posted in Recipes with tags , , , , , , , , , on February 1, 2011 by KarenElizabeth

My most hated of all household chores isn’t cleaning the bathroom.  It’s not scrubbing the floors.  It’s not washing the ceilings, or doing the laundry, or any of the other things which many people will state when they complain about housework.

No, my least favourite household chore is the dishes.

For someone who cooks almost every single meal from scratch, this can quickly grow to become a problem.  Without the disposable containers of take-out and pre-packaged meals, it’s hard to make anything that doesn’t create at least a small pile of dishes to be done.  A pot for this, a pan for that, a bowl and a set of tongs and a spatula … and if, like me, you’re prone to letting the dishes go for a couple of days before rolling up your sleeves and getting to it, it can become a pretty daunting task.

It’s at times like this when I am thankful for meals that can be made using only one pot, one spoon, a cutting board, and the dish you serve it in (if you’re feeling especially lazy, you can even eat it right out of the pot and save yourself one more dish).  But, contrary to popular belief, one-pot meals need not consist of foods like ramen noodles, condensed soups, and Kraft Dinner.  You can make something classy enough that you’d serve it to company (probably *not* right out of the pot, though), and still keep your dishes to a bare minimum.

Tonight’s dinner is a creamy pasta with chicken, carrots, onions and mushrooms, and I’m making enough for 2 servings (mmm, leftovers for lunch tomorrow!).  You can increase the amounts you’re using to make more — none of the measurements are particularly exact.

I began by cooking up a bone-in chicken breast (you can use boneless if you prefer, but bone-in is less expensive to buy).  I put a couple inches of water in the bottom of my pot (about 2 cups worth), added the chicken breast, put the lid on, and simmered until the chicken was thoroughly cooked.  When cooking in water you don’t need to worry about overcooking, because the meat’s not going to dry out on you.  Just keep an eye to make sure the water doesn’t all evaporate away, because you don’t want your meat getting stuck to the bottom of the pot and burnt.

Once the meat is thoroughly cooked, remove it from the pot and set it aside to cool down enough that you can handle it.  While you’re waiting, begin working on the sauce.  Add about a quarter cup of cornstarch to the water still in the pot, and whisk until it’s dissolved.  This will help to absorb any fat from the chicken and keep your sauce from separating, and will also help the sauce to thicken up and become creamy.  Add another cup or so of water, and about a half-cup of half-and-half cream.  Your sauce will be quite thin at this point, but that’s okay — it’s going to simmer down during the cooking, and some will be absorbed by the pasta later.

You can also add some spices at this point — a bay leaf or two, some poultry seasoning, garlic powder, rosemary, black pepper, whatever catches your fancy.  Get creative if you wish; an Indian masala spice blend makes a really nice sauce, or you can use some paprika and chili powder to make a spicy, more colourful dish.  Be a little bit conservative when adding spices here — the sauce will thicken up and the flavours will concentrate during cooking, and you don’t want to accidentally over-spice.  It’s easy to add more later, but can be difficult to compensate for having put in too much.  Definitely don’t add any salt until the end, as it’s very easy to over-salt a dish at this point.

Chop up half of a cooking onion, two small (or one large) carrots, a handful of mushrooms, and your chicken breast (remove the bones and discard them).  Use other vegetables if you would like to, but these things make a nice, balanced mix.  Put it all into the pot, return it to a simmer, and let it cook until the veggies have all softened up.

Once everything is thoroughly cooked, you can add your pasta noodles, as well as any soft items (green onions, kale, etc) that only need a few minutes to cook.  Watch the pot and stir things around occasionally to stop the noodles from sticking to the bottom.  Once the noodles are soft, give the sauce a taste to see if it’s spiced well enough for you.  If it all tastes good, it’s ready to eat!


Make it Gluten-Free!

This same technique works well for cooking rice (or rice noodles), and so is excellent for people who are trying to go gluten-free.  Using gluten-free pasta or rice in place of the normal pasta noodles makes an easy dish, with none of the gluten or wheat products often found in commercially prepared sauces.


Some Other Ideas, and Troubleshooting

You can also do other types of sauce in this same way — try making a tomato sauce by adding half a small can of tomato paste instead of the cream, or try an Asian-inspired sauce with sake or white wine and a tablespoonful of soy sauce — this is especially nice with rice.  You can use other meats in place of the chicken (lean sausage or ground beef works excellently), just avoid fatty cuts as they will make the sauce a bit greasy.

If you find that your sauce is a bit too thin, simmer it a bit longer and/or add a bit more corn starch.  If it’s too thick, just stir in a little more water.

And that’s all there is to it!  A delicious homemade meal, without the big pile of dishes.

Gluten Free Jam Cookies

Posted in Recipes with tags , , , , , , on December 22, 2010 by KarenElizabeth

It’s the winter solstice (or rather, it WAS the winter solstice yesterday), with all of the various holiday celebrations that come along with that.  ‘Tis the season of food, and especially of baked goods — a situation that my friend with a gluten allergy laments, since he can no longer eat most of the deliciousness being prepared at this time of year.

Fortunately, there are people like me around who are always willing to try a new recipe.  And I think I’ve hit on a winner with this one:  a gluten-free cookie that isn’t supremely crumbly, doesn’t require a dozen different kinds of flour, and actually tastes pretty darn good.  You’d hardly know they’re gluten free at all, and that’s exactly the way I like it.


The Ingredients

  • 3/4 cup rice flour (brown or white)
  • 1/4 cup sticky rice flour (look in the Asian food section of your grocery store)
  • 1 cup ground nuts (I like almonds or walnuts, but use whatever you like)
  • 1/2 tsp salt
  • 2 tbsp vegetable oil
  • 1/4 cup honey, maple syrup, or corn syrup
  • 1 tsp vanilla
  • 1 egg (beaten)
  • jam (whatever kind you like best)


The Prep

Mix together the dry ingredients, then add the oil, honey, vanilla and egg.  Blend thoroughly.  The dough will seem kind of thin — more like a muffin batter than a cookie dough, really.  But that’s okay, it’s expected to be that way.  Chill your cookie dough for at least an hour or two in the fridge to make it easier to work with.

For the next step I like to work on a surface dusted with rice flour.  The dough is kind of sticky, and this makes it simpler.  Use a teaspoon to pick up spoonfuls of dough, one at a time, and drop them onto your floured surface.  Use your hands to roll the dough into a ball, and then transfer the ball to a cookie sheet.

Once all of your dough balls are prepared, use your thumb to make an imprint in the center of each one.  Fill this indent with jam (for today’s batch of cookies I used elderberry jam, but that’s just what I happened to have in the fridge — any kind of jam is delicious in these).

Bake the cookies at 350 degrees for 8 to 10 minutes, then transfer to a rack to cool.  This recipe makes about 2 dozen cookies, and can easily be doubled if you want to have more.

Enjoy!

Happy Gluten-Free Thanksgiving – Part One: GF Cornbread & Stuffing

Posted in Recipes with tags , , , , , , on October 10, 2010 by KarenElizabeth

Happy Canadian (a.k.a. “real”) Thanksgiving, minions!

As I may have mentioned before in this blog, one of my good friends recently discovered that his ongoing digestive issues were not the result of his body trying to destroy itself, but instead were caused by an intolerance to gluten.  He’ll be one of my guests at my Thanksgiving dinner tonight, so I’m going entirely gluten-free with the meal.  That means gluten-free bread (in this case, cornbread), gluten-free gravy, gluten-free pumpkin muffins for dessert, and gluten-free bread stuffing in the turkey.

I recently posted my mom’s recipe for bread stuffing, which is a favourite food of mine.  There was never enough stuffing to go around at big family meals when I was growing up, and I’ll still happily sit down and eat three servings of the delicious concoction.  I don’t want my gluten-free friend to be unable to eat the turkey, though, so this time I’ve got to get a bit creative.  Some searching around the Internet yielded help:  I found several recipes for gluten-free cornbread, and after a few experiments have come up with a version that is easy to make, doesn’t require ten different types of flour, and holds together beautifully despite the lack of gluey gluten.   I’ve also managed to make it without xanthan gum, which seems to be a common requirement in gluten-free baking (and if you want a spongier cornbread, it’s probably a good idea to add a half-teaspoon of the stuff) — I avoided it because my grocery store only sells xanthan gum in teeny little very expensive packages, and I’m hoping to find it more inexpensively somewhere else.  In this particular case, an extra egg to hold things together seems to have done the trick quite well.

My GF Cornbread Recipe

  • 1 cup rice flour (brown or white; I didn’t find it made any difference)
  • 3/4 cup fine corn meal
  • 2 tbsp sugar or honey
  • 2-1/2 tsp baking powder
  • 3/4 tsp salt
  • 2 eggs (beaten)
  • 1 cup milk
  • 1/4 cup + 1 tbsp canola or corn oil
  • 1 tsp ground cloves and/or chili powder (if desired)

Start by pre-heating the oven to 400 degrees Fahrenheit.  While you’re doing this, put the baking pan you’re going to use into the oven so that it can pre-heat as well.  I use a 9 inch round cake pan, but a square pan would work just as well.  Having the pan nice and hot before the batter hits it will help you to get that nice crust on the outside of your bread.  Once the pan is hot, add a tablespoon of oil to it to prevent sticking and help the bread start cooking nice and fast.

Combine the dry ingredients and wet ingredients separately.  If you like your cornbread sweet, omit the cloves and add an extra tablespoon of sugar or honey.  If you prefer spicy, add the cloves and/or chili powder in with the dry ingredients (feel free to use other spices if you like; cornbread can be made with all sorts of combinations).

Add the wet ingredients to the dry all at once, and mix only until everything is just blended.  Pour the batter immediately into the hot pan, and bake for about 20 minutes (until the edges turn goldeny-brown and the center is fully cooked).

Cornbread Stuffing

You can serve your cornbread hot and fresh from the oven (I’ll be making a batch up right before dinner time tonight), but if you want to use it for making stuffing, you’ll want to have it prepared the day before.  Once it comes out of the pan, cut it into 1-inch cubes and leave these out overnight to go slightly stale.  Stale bread works better for making stuffing, because it holds its shape for longer and doesn’t turn completely to mush when you add the eggs and milk.

Once you’ve got your stale cornbread ready, making stuffing proceeds just the same as if you were using regular bread.  Soften up some onion and other vegetables with butter and spices in a large pan or pot (for a turkey you’ll probably want to make 2 or 3 times as much as you would for a chicken; start with at least 4 cups of veggies).  Once the vegetables are nice and soft, remove them from the heat and add your cornbread, an egg or two, and enough milk to make the bread start falling apart.  Cram your turkey full of this deliciousness, and you’re ready to make Thanksgiving dinner!