Archive for cookies

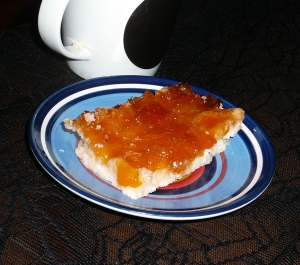
Gluten-Free, Vegan-Friendly Shortbread Cookie Bars

Posted in Recipes with tags , , , , , , , , , on December 2, 2013 by KarenElizabeth

Dinner parties at my house can be a little bit challenging, as I have a few friends with very restrictive dietary needs.  In most cases, I simply end up preparing a variety of dishes, making sure that each guest has at least something available for them to eat.  But on occasion I’ll try to make a dish that’s for everyone — and that’s where a creation like this one comes in.


P1070892

It’s gluten-free, so my 2 friends with gluten intolerances can eat it.  It has no coconut, no peanuts, no eggs, no soy, and no dairy.  It’s vegan.  And (this is important), it’s still delicious.


The Ingredients

  • 1 cup vegetable shortening
  • 1 cup sugar
  • 1/2 tsp vanilla extract
  • 1 shot of your favourite liquor or liqueur (I used brandy)
  • 1-1/2 cups rice flour
  • 1/2 cup tapioca starch
  • 1 tsp salt
  • 1/2 tsp baking powder (check to make sure it’s gluten-free; most are)
  • 1/2 cup to 3/4 cup of your favourite type of jam (I used apricot) for topping


The Prep

Preheat your oven to 350 F, and line an 8 x 12 baking pan with parchment paper (this is important because sticky, baked-on jam is very, very annoying to clean up).

In a mixing bowl, cream together the sugar and shortening.

Add the rest of the wet ingredients (except for the jam) & mix well.

Add the dry ingredients (adding in 2 stages is recommended to prevent rice flour from “poofing” everywhere while you stir).  No need to worry about overmixing, since this is gluten-free: just try to get a nice, even texture.  The resulting dough will be very soft and crumbly.

** Note – if you want to make your shortbread into individual cookies or shapes, refrigerate it for 30 minutes to make the dough a little bit easier to work with.  For cookie bars, though, this is unnecessary.

Press the dough into the bottom of your baking pan to create an even layer.

Spread jam over the top.

Bake for 30-40 minutes in the middle of the oven.  The cookie bars are done when you start to get some delicious-looking caramelization at the edges of the jam layer.

When you first take the cookies out of the oven, they will be VERY soft.  Use a butter knife to divide them into bars, then pop the whole thing into the fridge or freezer to cool down before attempting to remove them from the pan.  Once the tapioca flour sets up, they’ll be a nice, slightly-crumbly shortbread texture, but until then they’ll be a bit of a fall-aparty mess.


Variations

To change it up a bit, try adding nuts or a streusel topping on top of the jam layer, or drizzle melted dark chocolate over the finished cookie bars.

To make easy, round cookies instead of bars, try using a muffin tin (or mini-muffin tins) — press a bit of dough into the bottom of each, then top with jam.  Paper muffin-liners will help with preventing any sticking.

To make a thicker, layered bar, try using an 8 x 8 pan instead of an 8 x 12, and divide the dough in half.  Press half into the bottom, top with jam, then add the other half of the dough, and  top with more jam.  Increase the cooking time by a few minutes to ensure even cooking.
Gluten Free Jam Cookies

Posted in Recipes with tags , , , , , , on December 22, 2010 by KarenElizabeth

It’s the winter solstice (or rather, it WAS the winter solstice yesterday), with all of the various holiday celebrations that come along with that.  ‘Tis the season of food, and especially of baked goods — a situation that my friend with a gluten allergy laments, since he can no longer eat most of the deliciousness being prepared at this time of year.

Fortunately, there are people like me around who are always willing to try a new recipe.  And I think I’ve hit on a winner with this one:  a gluten-free cookie that isn’t supremely crumbly, doesn’t require a dozen different kinds of flour, and actually tastes pretty darn good.  You’d hardly know they’re gluten free at all, and that’s exactly the way I like it.


The Ingredients

  • 3/4 cup rice flour (brown or white)
  • 1/4 cup sticky rice flour (look in the Asian food section of your grocery store)
  • 1 cup ground nuts (I like almonds or walnuts, but use whatever you like)
  • 1/2 tsp salt
  • 2 tbsp vegetable oil
  • 1/4 cup honey, maple syrup, or corn syrup
  • 1 tsp vanilla
  • 1 egg (beaten)
  • jam (whatever kind you like best)


The Prep

Mix together the dry ingredients, then add the oil, honey, vanilla and egg.  Blend thoroughly.  The dough will seem kind of thin — more like a muffin batter than a cookie dough, really.  But that’s okay, it’s expected to be that way.  Chill your cookie dough for at least an hour or two in the fridge to make it easier to work with.

For the next step I like to work on a surface dusted with rice flour.  The dough is kind of sticky, and this makes it simpler.  Use a teaspoon to pick up spoonfuls of dough, one at a time, and drop them onto your floured surface.  Use your hands to roll the dough into a ball, and then transfer the ball to a cookie sheet.

Once all of your dough balls are prepared, use your thumb to make an imprint in the center of each one.  Fill this indent with jam (for today’s batch of cookies I used elderberry jam, but that’s just what I happened to have in the fridge — any kind of jam is delicious in these).

Bake the cookies at 350 degrees for 8 to 10 minutes, then transfer to a rack to cool.  This recipe makes about 2 dozen cookies, and can easily be doubled if you want to have more.

Enjoy!

My Favourite Chocolate Chip Cookies

Posted in Recipes with tags , , on January 20, 2010 by KarenElizabeth

I do love my fancy cooking, but sometimes it’s nice to just go back to the basics.  Chocolate chip cookies, fresh from the oven, are definitely an ultimate comfort food — and this recipe is so good you’d swear your grandmother made them herself.

The Ingredients

  • 1 cup packed brown sugar
  • 1/2 cup white sugar
  • 1 cup butter, softened
  • 1 large egg
  • 1-1/2 cups all purpose flour
  • 3/4 cup whole wheat flour
  • 1 tsp baking soda
  • 1/2 tsp salt
  • 2 to 3 cups of chocolate chips, nuts, raisins, etc. (your choice)

The Prep

Preheat the oven to 375 Fahrenheit.

In a large bowl, cream together the sugar and butter.  Beat in the egg.

In a second bowl, combine the flours, baking soda and salt.  Add the dry to the wet ingredients in 2 additions, mixing well.

Finally, add your chocolate chips and other goodies (the cookies in the picture contain chocolate chips, white chocolate chips, and unsalted peanuts, but I mix it up depending on my mood and what’s in my cupboards).

The dough will be slightly crumbly in appearance, but don’t worry — all that butter will make for a nice soft, chewy cookie.  Use your hands to roll 1-1/2 to 2 inch balls of dough, and space them about 2 inches apart on a cookie sheet.  Bake for about 10 minutes, until they’re nice and golden.  Let them cool on a rack.

The Results (and some hints & tips)

The whole batch makes about 4 to 5 dozen cookies, depending on just how big you make them.  If that seems like too many cookies all at once (hah, too many cookies — that’s a hilarious situation), feel free to pop half the dough into an airtight freezer bag, and it will be just fine in the freezer for a month or two (until your next cookie craving).  Then just thaw it out in the fridge overnight, and you’re ready to make more cookies.

If you’re like me and tend to forget to take your butter out of the fridge a few hours before you want to bake, I’ve got a trick for you.  Put a cup of water in the microwave for a minute or two.  Cut your butter up into small cubes and put them into a bowl.  Once it’s nice and steamy in the microwave, turn the power off, put your butter in there with the cup of hot water, close the door and just let it sit for a few minutes.  Your butter will soften up, without melting.

And if you’re not a fan of butter, you can use margarine instead.  The cookies will come out slightly crispier, but the taste will be just fine.  But I assure you, it’s way gothier to use butter.