Archive for the Recipes Category

Coffee!

Posted in Ramblings, Recipes with tags , , , , , , , on January 6, 2015 by KarenElizabeth

I’m trying to get back into the habit of blogging a bit more regularly, so in that interest, here’s a more lighthearted post than I am sometimes wont to share:  Coffee!  A bit about the history, science, and serving of one of my favourite beverages.

coffeebeans2

The History

According to the International Coffee Organization, coffee trees first originated in the Ethiopian region of Kaffa, where the “coffee cherries” (as the beans were called) were eaten by slaves.  The name “Kaffa” means “drink made from berries”, so it’s obvious that coffee was an important regional drink.  Once the beverage started to become known & spread through the Arab world (originally as a part of religious ceremonies, then later entering secular culture), their traders tried to gain a monopoly by imposing strict bans on the trading of fertile beans, but this couldn’t last forever:  in the early 17th century the Dutch brought live plants to India and Java for cultivation (although an alternate story has an Arabic holy man strapping fertile beans to his chest and smuggling them to India, which I must admit is a more romantic tale), and the coffee plant began to spread worldwide.  One particularly interesting story is that of how coffee came to the island of Martinique:

In 1720 a French naval officer named Gabriel Mathieu de Clieu, while on leave in Paris from his post in Martinique, acquired a coffee tree with the intention of taking it with him on the return voyage. With the plant secured in a glass case on deck to keep it warm and prevent damage from salt water, the journey proved eventful. As recorded in de Clieu’s own journal, the ship was threatened by Tunisian pirates. There was a violent storm, during which the plant had to be tied down. A jealous fellow officer tried to sabotage the plant, resulting in a branch being torn off. When the ship was becalmed and drinking water rationed, De Clieu ensured the plant’s survival by giving it most of his precious water. Finally, the ship arrived in Martinique and the coffee tree was re-planted at Preebear. It grew, and multiplied, and by 1726 the first harvest was ready. It is recorded that, by 1777, there were between 18 and 19 million coffee trees on Martinique, and the model for a new cash crop that could be grown in the New World was in place.
– International Coffee Organization

In Europe during the 17th century, coffee was widely believed to have medicinal properties (not entirely untrue, since coffee has been shown in various studies to prevent Parkinson’s disease, type 2 diabetes, and liver diseases, as well as decreasing the risk of depression), and it quickly became a part of the mainstream.  Coffee houses soon became a place for political groups to gather & discuss their plans (most famously, the Boston Tea Party was planned in a coffee house in 1773), and many coffee houses evolved into major financial institutions (including Lloyds of London, the New York Stock Exchange, and the Bank of New York).

In 1884, an important innovation in coffee technology came along:  Angelo Moriondo’s steam-driven instantaneous coffee-making machine (patent no. 33/256).  In 1902, Luigi Bezzera patented his improvements to the device, and then in 1905, the patent was purchased by Desiderio Pavoni, who began to produce the world’s first commercially available espresso machines.  The espresso machine was further refined in 1932 by Achille Gaggia, whose higher-pressure models produced what we would recognize as espresso today:  thick, syrupy coffee topped with a golden foam that Gaggia dubbed “caffe crema”.  The first Faema machine, introduced in the 60s, replaced the manual power required to pull a shot from the Gaggia machines with a motorized pump, but otherwise espresso has remained largely unchanged since WWII.


Types of Coffee Makers

The way your coffee tastes depends largely on the way it is made, and to that end there are a variety of different coffee brewing methods available.  Each method has its benefits and downsides, and of course each camp has its vehement defenders.

choose-coffee-makerProbably the most familiar (to a North American, anyway) is the inexpensive drip coffee maker.  There are a few variations available — basket vs. cone filters, glass vs. thermal carafes, and of course there are all the added features like clocks, timers, radios, automatic shut-off, etc.  Most of us grew up with one of these in our kitchens, and the gurgle-sputter noise as the last drips finish brewing is a friendly, homey, nostalgic sort of sound.

Drip coffee is unquestionably the simplest to make.  No worries about timing, or even careful measuring — just scoop out a few heaping tablespoons of ground coffee into the filter, pour in water, and turn on.  A few minutes later, you’ll have fresh coffee — no fuss, no muss.  And most machines will turn off all by themselves, so you don’t need to worry about whether you forgot to hit the button — some even turn on by themselves, only needing to have the timer set the night before so that you can wake up to pre-made coffee before your early morning shift.  Drip coffee is also the most convenient for serving a crowd — easily make enough for the whole family all at once, without having to stand there monitoring it.  Unfortunately, drip coffee is also the least flavourful method — the water in these machines doesn’t get as hot as when brewing by other methods, and thus less flavour is pulled out of the beans.  You can improve the flavour you get by purchasing better quality whole beans & grinding them fresh each day, but this does somewhat defeat the “easy & no fuss” factor that makes drip machines appealing in the first place.

espresso machineEspresso machines (mentioned earlier in the “history” section) are at the opposite end of the spectrum, in many regards.  Expensive — a good one can easily set you back a thousand dollars — and fussy — the temperature and pressure need to be adjusted to account for humidity and barometric pressure on a regular basis in order to maintain quality — espresso drinks are something that many people leave to the professional baristas at their favourite coffee shop.  But all of that fuss means a lot more control over your final cup of coffee, and in a house with coffee drinkers who have widely varying tastes, this can be a big plus, because each person can prepare their individual coffee to their individual liking.  Espresso machines are also useful when you have just one or two coffee drinkers, and don’t want to make & waste full pots.

Just like with drip coffee, you can use absolutely any beans in an espresso machine, but lower quality beans will show more starkly:  espresso machines, with their high pressures, actually emulsify the oils in the coffee beans, so older or cheaper beans will result in very bitter espresso.  Most espresso machines come with a “steam wand” attachment so that you can easily prepare beverages such as lattes and cappuccinos by steaming the milk, which greatly expands the usefulness of this counter-space hog.

Aluminium_Espresso_Coffee_MakerThe stovetop espresso pot, or “Moka Pot” as they are commonly known, brews an espresso-like coffee under less pressure (usually about 2 bars), thus emulsifying less of the oils and producing less “crema”.  It is not actually a “true” espresso, which is defined by the 9 bars of pressure used in standard machines, but it tastes similarly & can be used for making a delicious latte, americano, or cafe-au-lait.  Moka Pots are actually one of my personal favourite home-brewing methods, as they are great for making coffee for only one or two people (although you can get larger pots designed for making up to 6 cups at a time), and result in a stronger, richer flavour than you get with a drip coffee maker, without the sediment problems of French press coffee (see below).  It tastes very similarly to coffee made in a percolator, without the risk of over-extracting the beans by recirculating the coffee through them.  Moka Pots are often confused with percolators by people who are not familiar with them.

Coffee_Percolator_Cutaway_Diagram.svgPercolators are distinct from stovetop pots because there is not a separate chamber for the coffee after brewing — it simply drips back down into the main body, where water was poured in at first.  Percolators have gone out of fashion since the advent of the drip coffee maker, but were once the worldwide standard for brewing — and they are fairly simple, as long as you keep an eye on the time.  They do tend to make better tasting coffee than drip coffee makers as long as you don’t over-extract the beans by leaving it on the heat for too long (which results in bitterness), because the water can get to a higher temperature, allowing for more flavour extraction.  Unfortunately, their drop in popularity has meant that finding filters for them is almost impossible — percolator purists tend to have to buy online (although there are some “permanent filters” available these days, which can mitigate that problem).  People who enjoy camping often swear by perk coffee (and incidentally, the percolator is where the phrase “the coffee is perking” comes from), because it’s easily prepared over an open fire or on a camp stove.

french-press-basic-mThe French Press has seen a surge in popularity recently, especially among singles and apartment-dwellers (like the Moka Pot, it takes up very little in the way of counter space, and doesn’t require a devoted outlet).  Devotees of the French Press declare that the slower brewing method produces a fuller flavour, but I personally tend to find it bitter.  There is also a distinct likelihood that French Press coffee will have large chunks of coffee grounds still floating in it after filtering, which is what really turned me away from the method — I don’t like grit in my teeth after drinking.

The French Press is an old-fashioned and simple method of brewing, and highly portable, so its popularity makes sense.  Like with percolators, you do need to keep an eye on the time — the longer you brew, the more likely those bitter flavours will come out, so you have to find the right balancing point for your taste buds.  High quality, freshly ground beans will also mitigate the bitter-factor.

best-coffee-maker-k-cup-from-keuringA new innovation in home coffee brewing technology is the single-cup brewer, popularized by brands like Keurig and Tassimo.  Also popular among the singles-and-apartment-dwellers crowd, these machines are quite versatile, but also represent the most expensive method of getting your daily caffeine-fix short of actually going to a coffee shop and paying someone else to do it.  Many of the brand-specific “k-cups” and “pods” can run well over a dollar apiece, and then there’s also the start-up cost (usually several hundred dollars) to be considered.  Most of the “pods” available are low-quality coffee brands, too, so you’re not getting the best tasting coffee, even if it’s costing you the most money.  They’re ridiculously simple, though:  just pop in a pod and whatever drink you wanted magically appears in your cup, just for you.  And with the advent of refillable, reusable “pods” that you can fill with whatever type of coffee you like, the cost can be brought down with a little effort.  I’ll admit to having enjoyed the novelty of them when staying at hotels or working in buildings where there was a single-cup brewer available for use.  And some of the smaller ones are quite portable — a woman I work with brings her little Tassimo brewer to work with her, even when we’re on set, so that she can always have fresh coffee.  But to be honest, if I was going to spend that kind of money on home-brewed coffee, I’d get a proper espresso machine and skip all the single-cup nonsense.
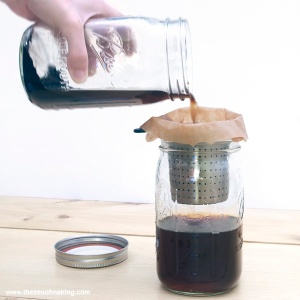
cold_brew_coffee_06While there are dozens of other little “niche” methods of making coffee (one of the coffee shops that I regularly frequent has a whole mad-science laboratory full of contraptions for roasting, grinding & brewing), the only other one that I think is necessary to mention here is cold-brewing (follow the link for more detail).  Perfect for making iced coffee beverages in the summer (or, let’s face it, any time of year at all, because iced coffee is delicious), cold-brewing produces an incredibly smooth-flavoured coffee with very little bitterness or acid.  You can get whole fancy contraptions for doing it (the “Toddy” system is very popular & works well; we used it at a coffee shop where I used to work), but all that’s really needed is 2 mason jars, a large funnel, and a filter (just buy a box of the cone-filters designed for drip coffee makers, or use cheesecloth).  In one mason jar, put coarse-ground coffee beans & cold water.  Leave it in the fridge for 12 hours, then pour through the funnel (using the filter to strain out the grounds) into the second mason jar.  Pop the lid on and you’ve got cold-brewed coffee to last you for the whole week.  Getting the exact amount of coffee beans, the grind, and the amount of time correct can take a bit of trial-and-error, but it’s an experiment worth doing if you enjoy iced coffee drinks.  Never again will you just pour hot coffee over ice, watering it down & resulting in high-acid bitterness.


Cappuccino, Latte, Cafe-au-Lait?  Whaa?

When I had a part-time job as a barista, this was one of the questions that got asked literally every day, so I’ll go through a few of the most common coffee and espresso beverages that you’ll see on the menus at various cafes.  There might be a few on here you’ve never heard of — feel free to try to stump your local barista with an offbeat one, but remember to tip well for the inconvenience.

Cafe Americano (or just “americano” to many) is a shot of espresso, topped up with hot water to “lengthen” it.  The story goes that American soldiers in Italy during WWII found that they couldn’t find the perk coffee they were accustomed to, because espresso machines had exploded on to the scene.  They didn’t enjoy the thick, strong, tiny drinks that were so popular, and would dilute them with water to closer approximate the coffee they knew and loved.  Americano coffee has a different flavour from your standard drip or perk coffee, due to the different extraction method, and many people prefer it for that reason.

A Long Black is virtually identical to an americano, but instead of adding the water to the espresso, you add the espresso to the water.  Purists claim that this maintains more of the espresso’s natural “crema”, and there is a slight visual difference, but I can’t say that it alters the flavour (to my tastes, anyway).

The Red Eye (also known as the “shot in the dark”) is a single shot of espresso added to a cup of dark roast coffee — the point being to increase the boldness, flavour, and caffeine content of the drip coffee.  If you want to add 2 shots instead of just one, it’s called a Black Eye, and 3 shots is a Green Eye.

Cappuccino is a shot of espresso topped with hot steamed milk & foam.  Traditionally, you want about equal amounts of milk & foam (the ideal cappuccino is 1/3 espresso, 1/3 milk, 1/3 foam), but you can ask for your cappuccino “wet” (more milk) or “dry” (more foam) to adjust the flavour, or have extra shots of espresso added for boldness.  The foam on any espresso drink should be made up of very tiny bubbles (commonly called “microfoam”), visually resembling the medium-density upholstery foam you might find in a couch cushion.  Big bubbles are a sign of an inexperienced or lazy barista.

Latte is very similar to cappuccino, but uses almost all hot milk, with just a little bit of foam at the very top.  Because there is more milk, lattes are less strong in flavour than a cappuccino — and they’re also ideal for adding extra flavours to (ie. vanilla, hazelnut, pumpkin spice, etc).  A mocha latte (or just “mocha”) is a latte made with chocolate.  Lattes are often scoffed at by coffee purists as a drink for people who lack taste, but hey, sometimes we all just want something sweet & simple.

Chai lattes or tea lattes are not made with espresso, but rather with very strong tea (or in some cases, a boxed tea concentrate — most mainstream chains like Starbucks will use something from a box or bottle in order to maintain consistent flavour from shop to shop).  These boxed concentrates are often pre-sweetened, so be aware when ordering that you should taste it before adding sugar.  Matcha lattes are made with a powdered form of green tea, and the milk will actually turn a fairly bright green (it looks kinda disgusting, but tastes delicious).

Cafe-au-lait is sometimes used to mean the same as “latte”, but actually refers to a strong dark-roast coffee (not espresso) mixed 1:1 with hot milk & no foam.  Check with the barista before ordering to make sure you know what you’re getting.

Macchiato is my personal favourite espresso drink.  Resembling a small cappuccino, it consists of a shot of espresso either poured into or topped with approximately an equal amount of foam.  Espresso shots for macchiato are usually pulled “long” (a bit more hot water added to the shot), but the method of preparation can vary from place to place.  When I make them for myself, I just pull a single shot & top with foam, no extra fuss.  It should be noted that the Starbucks “caramel macchiato” drink in no way resembles what an actual macchiato is; it’s just an example of corporate marketing people taking a random Italian-sounding word and slapping it on a drink.

A flat white is 1:1 espresso and steamed milk, no foam (that’s what the “flat” refers to).  They are usually served in glass cups with wire handles, for no particular reason other than “it’s traditional”.  The flat white has become a very competitive art, and people who drink them regularly are often very devoted to their particular way of having it.

Caffe Leche is espresso served with sweetened condensed milk.  It’s basically like drinking a coffee-caramel.

Viennese coffee (or “cafe Vienna”) is espresso topped with whipped cream (and often sprinkles or chocolate shavings).

Turkish coffee is not espresso at all, but rather coffee served in a very primitive/traditional fashion.  Coffee grounds, pounded completely to dust, and sugar are put directly into water & the water is boiled to extract the coffee.  The pot has to be removed from the heat as soon as it starts to boil, or the coffee will taste “burnt”, so this is a method that requires some patience and attention.  There is a flair to pouring, too, so that the foam from the coffee is divided evenly between the cups.  Drinking coffee with the grounds in it is a bit of an acquired taste, and can leave you with an unpleasant “gritty” feeling on your tongue if the coffee was not pounded fine enough.

A frappe is also not actually an espresso drink; it’s made with instant coffee, water, and condensed milk, and shaken until very foamy.

Espresso Cubano (or just “Cubano”) is a shot of espresso pulled directly over demarara or raw brown sugar.  Put the sugar into the cup before pulling the espresso on top of it, so that the two will meld while the espresso pours.

Espresso Romano (or just “Romano”) is a shot of espresso served with a slice of fresh lemon — and it is drunk by running the lemon over the rim of the cup before you sip.

Doppio usually refers to a simple double-shot of espresso, but the name is actually derived from the double-spouted filter head used on most commercial espresso machines.  In barista competitions, the doppio is the “standard” measure of espresso used in a drink.

Ristretto refers to a shot that is “restricted” — pulled for a shorter amount of time.  This truncated pull results in a shot that is sweeter and has more crema than a standard single-shot or doppio.

Affogato is espresso served over a dessert — often an ice cream or pudding, but occasionally a cake.  Some dessert menus at Italian restaurants will offer the option to have your dessert “affogato style”.

Recipes: Quiche, a Basic How-To

Posted in Recipes with tags , , , , , , , , , , , , , , , , on January 2, 2014 by KarenElizabeth

When I was in university, I made my first vegetarian friends — and I had no idea how to feed them.  My high-school girlfriend’s brief flirtation with vegetarianism had consisted mostly of grocery-store-brand veggie lasagna, vegetarian chili-cheese fries at the cafeteria, and eating a lot of raw veggies & dip.  I’d never had to cook an entrée that didn’t include meat, before, and wasn’t entirely sure where to begin.

A search online for vegetarian recipe ideas led me to a food I’d never tried before:  quiche.  I figured that something which looked essentially like an omelette in a pie crust couldn’t possibly be half bad, and whipped up a quick version with broccoli, mushrooms, and three kinds of cheese.  It was a success, and quiche entered my cooking arsenal as an easy, quick, and crowd-pleasing piece of comfort food.

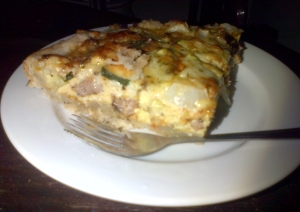
quiche

These days, while quiche remains an easy default for vegetarian-friendly meals, it’s something I make more often as a portable lunch-option for work, or as something I can quickly reheat when I’m too busy to cook for a few days.  It’s also a great way of using up leftovers, since you can throw pretty much anything into a quiche and it’ll come out tasting pretty good.  I usually do, in fact, use meat in my quiches — today’s version includes pork sausage — but they’re an incredibly flexible food that you can easily tailor to your particular desires.


The Crust

The most labour-intensive part of a quiche is the crust.  I generally use my basic pie crust recipe as the starting point, but since a quiche doesn’t require a top crust I’ll just whip up a half-sized batch.

Cut a half-cup of vegetable shortening into 1-1/3 cups all-purpose flour and a pinch of salt, until you’ve got a crumbly mixture with no big clumps of shortening.  At this point, since quiche is a savoury dish, you may want to add a few herbs — I like to toss in a sprinkling of dried Italian herbs for visual interest and a bit of a flavour-hit in the crust.  Sprinkle cold water in, a tablespoon at a time, until the dough just comes together into a slightly-crumbly ball.  Refrigerate the dough for 15 minutes or so before rolling out into the bottom of your pie dish (or a round cake pan will do, if you want a deeper quiche with a more straight up-and-down edge — a springform pan will allow you to make a deep-dish quiche without the difficulty of removing it at the end).

Alternatively, you can either use a store-bought crust, or puff pastry.  Either is perfectly acceptable (although everyone should really make a scratch-made crust at some point in their life).


The Filling

As I’ve already mentioned, you can put pretty much anything you like into a quiche.  Meat should be pre-cooked (for today’s quiche, I browned the sausage & some onions in a frying pan for the filling), but vegetables can be either cooked or raw — I tend to prefer raw veggies, since they retain more of their individual flavour and texture within the cooked quiche.  Frozen veggies are perfectly acceptable, here — just give them a rinse to get rid of the “freezer taste”.  Dark green veggies like broccoli, asparagus, and spinach are classic quiche ingredients, but don’t feel limited; use whatever you like.

Leftovers are a great option for quiche, so this is the perfect place to use up the last bits from your roast or chicken dinner.

Depending on the texture you prefer, you can use large or small pieces in your filling.  I like the texture & flavour variations provided by using larger pieces of veggies, but it’s entirely up to you.  Smaller bits will give a more uniform flavour throughout the dish.

quiche filling

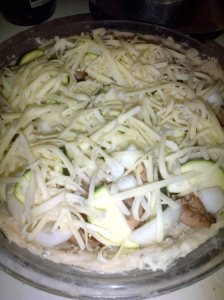
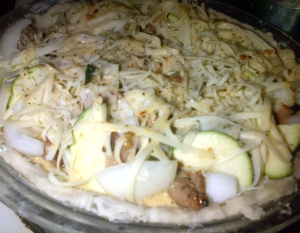
Where I differ from many classic quiche recipes is that I like there to be a LOT of stuff in my quiche.  While custard is delicious, I prefer to add just barely enough egg & cream to hold the whole thing together, to make a more hearty meal.  So as you can see in the photo, I fill my dish right up.  Meat, veggies, and plenty of cheese, with just a few little spaces in-between for the egg to fill.  Putting the majority of the cheese on top (use any kind you like; my quiche today has a combination of Parmesan and sharp Cheddar) makes for a nice toasted, crispy top that both looks and tastes delightful.


The Custard

The defining ingredient of quiche is, of course, the custard.  Thoroughly beating the eggs is important to getting a nice, fluffy texture on your finished product.  For my 9″ pie pan, I use 3 eggs and about a cup of cream (5-10%, although whole milk will do if you’re concerned about fat content).  Add your herbs & spices to your custard — salt, pepper, garlic powder, and paprika (be generous with the paprika) are my usual “basic” mix, and then I’ll add other spices to compliment whatever filling I’m using.  Chili spice or cayenne for a spicier meal, parsley & sage to go with chicken, rosemary with beef, dill & thyme with fish — or, like today, a generous scoop of curry powder to compliment my pork sausage.  Make sure the herbs & spices are thoroughly mixed in, then pour your custard mix slowly over top of the filling in the pie shell.  A few light taps on the side of the pie pan will make sure that the custard has filled up all the holes between the filling.

quiche before baking

Note that your quiche should not look particularly “full” of custard at this point.  It will puff up during cooking — if the pie pan is full to the brim, you’ll get spillover as things cook.  You can see in the pictures that mine looks quite “shy” before going in the oven, but once things are cooked the eggs have puffed up to fill the remaining space.

Cooking, Serving, Storing, and Re-Heating

In an oven heated to 375 Fahrenheit, bake your quiche for about 40 minutes (until the crust is golden-brown).  Once you take it out, let it sit for 5 minutes or so before serving — this will let the custard solidify a bit more, and make it easier to slice & serve.

quiche toasty cheese

I like my quiche with a bit of hot sauce on top, or occasionally a drizzle of balsamic vinegar.  If you’re feeling decadent, you can drizzle on a bit of hollandaise.  A 9″ pie pan makes about 4 servings.  A bit of salad on the side rounds out the meal, but certainly isn’t necessary.

Quiche will keep wonderfully for 3-4 days in the fridge — wrap tightly with plastic wrap or aluminum foil, or store in an airtight container, to prevent it from drying out.  Or you can divide it into portions & freeze for 2-3 months.

Reheating is best done in an oven or toaster oven, to maintain the crisp & flaky crust.  If you’ve frozen your quiche, reheat it directly from frozen, don’t thaw it out first.  If you’ve just been keeping it in the fridge, it should only take about 10 minutes to be heated through & ready to eat.

Microwaving is faster, but your crust will get soggy.  3-5 minutes should do, depending on your particular microwave.

You can also eat quiche without reheating, which is often what I’ll do at lunch time.

Gluten-Free, Vegan-Friendly Shortbread Cookie Bars

Posted in Recipes with tags , , , , , , , , , on December 2, 2013 by KarenElizabeth

Dinner parties at my house can be a little bit challenging, as I have a few friends with very restrictive dietary needs.  In most cases, I simply end up preparing a variety of dishes, making sure that each guest has at least something available for them to eat.  But on occasion I’ll try to make a dish that’s for everyone — and that’s where a creation like this one comes in.


P1070892

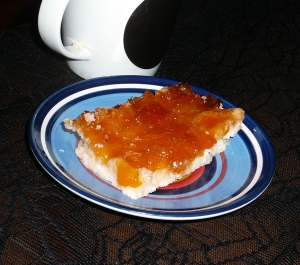
It’s gluten-free, so my 2 friends with gluten intolerances can eat it.  It has no coconut, no peanuts, no eggs, no soy, and no dairy.  It’s vegan.  And (this is important), it’s still delicious.


The Ingredients

  • 1 cup vegetable shortening
  • 1 cup sugar
  • 1/2 tsp vanilla extract
  • 1 shot of your favourite liquor or liqueur (I used brandy)
  • 1-1/2 cups rice flour
  • 1/2 cup tapioca starch
  • 1 tsp salt
  • 1/2 tsp baking powder (check to make sure it’s gluten-free; most are)
  • 1/2 cup to 3/4 cup of your favourite type of jam (I used apricot) for topping


The Prep

Preheat your oven to 350 F, and line an 8 x 12 baking pan with parchment paper (this is important because sticky, baked-on jam is very, very annoying to clean up).

In a mixing bowl, cream together the sugar and shortening.

Add the rest of the wet ingredients (except for the jam) & mix well.

Add the dry ingredients (adding in 2 stages is recommended to prevent rice flour from “poofing” everywhere while you stir).  No need to worry about overmixing, since this is gluten-free: just try to get a nice, even texture.  The resulting dough will be very soft and crumbly.

** Note – if you want to make your shortbread into individual cookies or shapes, refrigerate it for 30 minutes to make the dough a little bit easier to work with.  For cookie bars, though, this is unnecessary.

Press the dough into the bottom of your baking pan to create an even layer.

Spread jam over the top.

Bake for 30-40 minutes in the middle of the oven.  The cookie bars are done when you start to get some delicious-looking caramelization at the edges of the jam layer.

When you first take the cookies out of the oven, they will be VERY soft.  Use a butter knife to divide them into bars, then pop the whole thing into the fridge or freezer to cool down before attempting to remove them from the pan.  Once the tapioca flour sets up, they’ll be a nice, slightly-crumbly shortbread texture, but until then they’ll be a bit of a fall-aparty mess.


Variations

To change it up a bit, try adding nuts or a streusel topping on top of the jam layer, or drizzle melted dark chocolate over the finished cookie bars.

To make easy, round cookies instead of bars, try using a muffin tin (or mini-muffin tins) — press a bit of dough into the bottom of each, then top with jam.  Paper muffin-liners will help with preventing any sticking.

To make a thicker, layered bar, try using an 8 x 8 pan instead of an 8 x 12, and divide the dough in half.  Press half into the bottom, top with jam, then add the other half of the dough, and  top with more jam.  Increase the cooking time by a few minutes to ensure even cooking.

Recipes: Asian-Inspired Deconstructed Cabbage Roll

Posted in Recipes with tags , , , , , , , , , , on July 3, 2013 by KarenElizabeth

I’ve probably mentioned it many times before, but I am not a fan of summer.  The sweltering heat, the choking humidity and poor air quality, the burning sunlight — it all makes me pretty unhappy.

One of the many things that annoys me about summer is the difficulty of cooking decent meals.  Living in an apartment building, barbecue and outdoor cookery is not much of an option for me.  But being in the kitchen for any length of time heats up the entire apartment and just adds to the general discomfort of the season.  As a solution to this, I’ve developed a lot of recipes that take less than 20 minutes to prepare.  The less time spent in the kitchen, and the less time spent with the stove or oven running, the more comfortable I am with this whole “summer” thing.

Today’s recipe was a bit of a make-it-up-as-you-go affair, and it came out beautifully.

deconstructed cabbage roll

Feeling headachey and gross from a combination of heat and tiredness and depression, I was craving some sort of homey comfort-food.  Lasagna.  Meatloaf.  Cabbage rolls.  But all of those things take a lot of oven-time, which was obviously not an option in this weather.  A dig through the cupboards, though, revealed a package of rice noodles — what could I possibly do with those?  Some ground beef, Asian spices, and veggies later, I’d created something delicious.

The Ingredients

  • 1 medium-sized yellow onion, diced.
  • 3 cloves garlic, roughly chopped.
  • A thumb-sized piece of fresh ginger root, diced small or grated.
  • 1lb ground beef (or other ground meat or meat alternative — pork, chicken, or turkey would work just fine here, or go with tofu for a veggie option).
  • A splash of sesame oil.
  • A couple tablespoons of olive oil.
  • 1 small zucchini, chopped into bite-sized pieces.
  • 1/4 of a large cabbage, roughly chopped.
  • 2 tbsp soy sauce.
  • 1/3 cup lime juice.
  • A splash of fish sauce (omit for vegetarians).
  • Asian 5-spice blend of your choice (I make my own with cinnamon, dried chilis, anise, ginger, and tumeric — and I go heavy on the ginger and chili.  You can buy a pre-made mix or combine your own flavours).
  • Rice noodles (any style)

The Method

Heat up the olive oil and sesame oil in a large pan or wok, at medium-high heat.  Add in your onion, garlic, ginger, and beef.  Lightly brown these ingredients, then turn down the temperature to medium-low.  Add your soy sauce, lime juice, fish sauce, and spices.

At the same time, bring water to a boil in a separate pot.  The rice noodles only need to cook for about three minutes; as soon as the water is boiling you can drop them in, but don’t forget about them or they’ll turn to mush!  Rescue & plate them as soon as they’ve gone soft.

Cook your meat mixture for about 5 minutes to combine all of the flavours, then toss in your cabbage and zucchini (alternatively, you can use other veggies like eggplant, bell peppers, bok choy — whatever catches your fancy).  Stir the mix so that the veggies cook evenly, and as soon as they start to get nice and soft, it’s ready.  Spoon the meat mix over your rice noodles, and serve immediately (garnish with more chilis and a slice of lime if you want to get fancy).

This makes about 3-4 servings, depending on how hungry you are.  And it only takes about 15 minutes to prepare!


Any leftover meat mixture can be wrapped up in cabbage leaves and kept in the fridge to snack on cold the next day.  But this stuff is so delicious that you might not have any leftovers.

Recipes: Creamy Broccoli & Cheddar Soup

Posted in Recipes with tags , , , , , , , , , on March 17, 2013 by KarenElizabeth

This soup is a favourite food of mine — and it’s incredibly easy to make.  If you’re intimidated by cream soups, or just don’t tend to like the commercially available ones (I know I don’t — I find they’re always way too thick & the texture is off-putting), this is a great place to start.  You can use this same basic method to make any sort of cream soup — cream of mushroom, cream of celery, whatever catches your fancy.

You can also make this soup lactose-free and vegan-friendly by omitting the cream & cheese — it’s a delicious soup without those things, too.

Broccoli_bunches

Total prep time is about an hour and a half, although most of that is just cooking.  The actual work involved takes about 10-15 minutes.

Ingredients

  • 1 bunch broccoli, roughly chopped
  • 1 cup half and half cream (can be omitted or replaced with soy milk for lactose-free)
  • 3 cups stock (chicken or vegetable)
  • 3 cups water
  • 1 onion, diced
  • 3 or 4 cloves garlic, finely minced
  • a few tablespoons butter or margarine
  • 1/2 cup flour (or a flour substitute like corn starch, if going for gluten-free)
  • salt & pepper to taste
  • a pinch of paprika
  • cheddar or other cheese (I happen to like mixing 1/2 and 1/2 cheddar and swiss) (can be omitted if desired)

Prep

Start by pre-heating a large pot and melting your butter or margarine over medium-high heat.  Add your diced onion & garlic, and sautee until you start getting some nice brown colour going on (should just take a couple of minutes).  At this point, add your flour — this will absorb the butter and the liquid from the onions to make a roux, which will thicken your soup.  Keep stirring until all the liquid is absorbed, so that the flour doesn’t burn & stick to the bottom of the pot.

Add your stock & 3 cups of water to the pot, as well as your broccoli.  You can add a bit more water if the broccoli is not completely submerged.  Bring everything to a boil, and then turn down the heat to a very low level and let it simmer until the broccoli is thoroughly cooked & quite soft.

At this point you want to blend your soup to crush up the broccoli.  If you have an immersion blender, this is the perfect tool — or if not, you can pour your soup into a blender or food processor, and then return it to the pot once blended.  I like to only blend a little, to leave some chunks of broccoli and give the soup a better texture, but you can make it as creamy as you wish.

Once everything is blended together, add your cream & spices.  Careful with the salt, especially if you used a commercially made stock as your base — go lightly, and you can always add more later.  Remember that you’ll be adding cheese to this, and cheese has salt in it too.  Pepper, on the other hand, I encourage using a heavy hand with.  Paprika rounds out the flavour and compliments the garlic, as well as adding a little pop of colour (you can also sprinkle the bowl with paprika before serving, to add extra visual interest).

Return the soup to a simmer, and leave for 20 minutes or longer (to thoroughly merge all of the flavours).

Grated cheese should be added to the bowl right before serving — this means that the cheese will still be visible when the bowl hits the table, and also means that you don’t end up with cheesey goo stuck permanently to the bottom of your pot (makes for easier washing up).

And that’s all there is to it!

Changing it Up

This soup is super easy, so don’t be afraid to change it up with your own touches and ingredients.  Switch up the vegetables, or add meat to the pot (after you’re done blending things) for a heartier meal — I like adding bits of chicken or sausage (cooked in a frying pan with a bit of oil to give them some nice browned edges), or you can’t go wrong with bacon.  Try different types of cheese to add a different flavour (smoked gouda is delicious, or a creamy goat cheese for richness).  Try adding curry when you’re making your roux (curry likes to be cooked with oil, or it tastes “raw”), or a blend of Italian spices when you add your cream.  Or add some roasted tomatoes and/or red peppers to give it a really different flavour and colour.  Be adventurous!  And share your experimentations in the comments.

Oh, Fudge!

Posted in Recipes with tags , , , , , , , , , , , on May 19, 2011 by KarenElizabeth

I might as well get this out of the way right up front:  I am a fudge snob.  I grew up close by to two absolutely fabulous candy stores that made homemade fudge (Mill Creek Chocolates in Port Elgin, and The Tobermory Sweet Shop, where I also spent a summer working).  As a result, I find most fudge (especially the storebought stuff) to be a poor imitation of the “real thing”.  Real fudge is creamy, melty, and so sweet that even as a small, sugar-driven child I had a hard time eating more than a teensy piece.

So you can probably guess that when I make fudge at home, it’s good stuff.  No sweetened condensed milk here.  No marshmallow fluff.  No microwaving.  No powdered sugar.  Just awesome.

Now, to make fudge properly, you really, REALLY need a candy thermometer.  Digital is best, of course (mine cost less than $15 and has been SO worth the investment).  There are dozens of “tricks” out there for how to tell when your fudge has reached the proper stage (most common being the ‘cold water test’), but 90% of the time you’re going to end up with over- or under- cooked fudge if you’re not going by temperature, because things like the ambient humidity and the temperature of your ‘cold’ water are going to affect matters.

The real difference between a high-quality homemade fudge and most of the stuff you’ll find out there these days is the sugar crystals.  A really good fudge should be creamy, not grainy.  Getting the temperature and the ratios of the ingredients just right will help to keep your sugar crystals smaller.  The waiting time between boiling the mix and stirring the mix also helps — any crystals that start to form too early (usually along the top, where cooling is faster) will be broken up and re-absorbed during the stirring.  You could, of course, just spend 15 or 20 minutes stirring your fudge after cooking to inhibit crystal formation, but that’s a LOT of work — better to wait while things cool down a little, and then get to the stirring when it’s really needed.  One final trick: I also use a small amount of corn syrup, in addition to the sugar, as corn syrup is liquid at room temperature and this will help to improve the texture.

My basic vanilla fudge has only five ingredients:

  • 3 cups white sugar (you can use brown, but it gives a different flavour)
  • 1/4 cup corn syrup
  • 1/4 cup salted butter
  • 1-1/4 cups whole milk or light cream
  • 2 teaspoons vanilla extract

And that’s it.  Put it all into a pot over medium heat, and stir until it reaches a boil.  Then stop stirring.  Put your candy thermometer into the pot and just watch while the temperature climbs to 240 degrees Fahrenheit (should take 3-5 minutes).  Remove the pot from the heat, and then wait.  Don’t stir it yet.  Give it time to cool down to somewhere between 120 and 150 degrees Fahrenheit (this will take 15 minutes to a half hour, depending on the temperature in your kitchen).  Then you can start stirring.  Stir and fold the mix over on itself until it looks opaque and is becoming quite thick (about 3-5 minutes, depending on just how vigorous your stirring is).  Pour the mix into a pan (an 8×8 for shorter, wider squares, or a bread pan for taller slices).  It should be thick enough that you’ll actually need to press it down into the pan; it won’t flow easily into all the corners.  Let it cool down completely (put it in the fridge to make it firm and easy to slice), then wrap it to prevent moisture loss.

This recipe gives you a delicious, plain, simple fudge — but it’s only the beginning.  There are so many variations on plain old vanilla fudge, and with a little creativity you can create your own mixes, too.

For a chocolate fudge, use only 1 teaspoon of vanilla, and add 1/4 cup of unsweetened cocoa powder.

For a peanut butter fudge, use only 2 tablespoons of butter and 1 teaspoon of vanilla, and add 1/4 cup of peanut butter.  If you’d like a “crunchy” version, stir in peanuts once the mixture has cooled after boiling, just before you pour it into the pan.

For a maple fudge, just replace the corn syrup with maple syrup.  You can reduce or leave out the vanilla.

For a coffee fudge, either add a shot of freshly-made espresso to the mix, or dissolve a tablespoon of instant coffee granules in a tablespoon of hot water and add that.  You can add coffee to a chocolate fudge to get a nice mocha flavour, too.

For a peppermint fudge, just replace the vanilla extract with peppermint extract.  Same goes for any other extract — try orange, rum, anise, almond, or coconut!  For seasonal peppermint fudge at Christmas, add crushed-up candy canes to the mix once it has cooled down after boiling, just before you put it into the pan.

For a pumpkin pie spice fudge, reduce the vanilla to 1 teaspoon.  When the mixture has cooled to stirring temperature after boiling, add 2 teaspoons of pumpkin pie spice and blend well.  Alternatively, you can use other spices — cinnamon works nicely all on its own, or try adding chili powder or ginger to a chocolate fudge for a hit of the unexpected.

One of my personal favourites is chocolate with peanut butter swirls, which is achieved by first making chocolate fudge as described above.  Just before pouring the mix into a pan for the final cooling, add a couple tablespoons of peanut butter.  Give it a quick swirl, then put the mix into the pan and get the pan into the fridge before the peanut butter gets a chance to melt.

Another excellent option is rocky road fudge, which can be made with either vanilla or chocolate fudge as a base.  As with the peanut butter, wait until the last moment to add nuts, marshmallows and chocolate chips — quickly swirl them in, then get the mix into a pan and into the fridge for cooling.

Feel free to experiment with other flavours, and tell me in the comments what you’ve tried!  I’m thinking of doing a chocolate fudge with pretzel pieces, next — or possibly maple with plain popcorn mixed in.

Pesto; Pistou; Pasta

Posted in Recipes with tags , , , , , , , , , , on May 12, 2011 by KarenElizabeth

One of the greatest challenges of living alone is the simple fact that it’s often hard to motivate oneself to prepare delicious meals when there is no one else to impress.  The rewards of gourmet cooking are decidedly reduced when there’s no one ooh-ing and ahh-ing over your hard-wrought creations … and of course, cooking from scratch takes a lot more work and produces a lot more dishes than just simply throwing a frozen pizza into the oven.

Another trouble with cooking for one is that most things simply aren’t sold in single-sized portions.  Buying just one nice chicken breast, pound for pound, is two or three times the cost of purchasing an entire chicken.  And a lot of vegetables simply don’t come in smaller sizes — a bunch of celery is a bunch of celery is a bunch of celery, and damn that’s a lot of celery for just one person to eat before it goes limp.

Now, there are a lot of different solutions to these problems.  Cooking larger meals and then freezing the leftovers, buying frozen vegetable mixes to introduce more variety without having to buy a dozen different things, and making use of odds and ends in simple one-pot meals are all options that many of us single-types employ.  But one solution that I’ve found particularly useful, and somehow it doesn’t seem to be on most people’s lists of shortcuts, is the magic of sauces and spreads.

Making a large batch of, say, pasta sauce, is an easy way to use up vegetables before they go bad, and it also provides you with easily stored leftovers that can be re-heated and served very quickly.  In the 10-15 minutes it takes to boil water and prepare pasta, you can take a serving of sauce from the freezer, to a pan, and have it nice and warm by the time the pasta reaches al dente.  And there’s no need to get bored of eating the same thing all week long, because in the freezer the sauce will keep well for a month or two, allowing you to spread out your meals.  The same goes for many different sauces and spreads — even things that can’t be frozen can often be stored in the fridge or preserved in canning jars, in order to last much longer than the raw ingredients would on their own.

One of the fruit & vegetable shops near my house sells large bunches of fresh herbs for really excellent prices, but generally an entire bunch is much more than I could possibly use in a week.  I have a particular love, though, for fresh basil, and this week I just couldn’t resist picking up a bundle.  Enter: the magic of sauces and spreads.

Image by Paul Goyette, used under Creative Commons license

One of the ways in which most people are introduced to basil is through pesto, a popular spread with its roots in Genoa, northern Italy.  Pesto’s popularity is a testament to its deliciousness, and you might be surprised to find out just how easy it is to make:  a traditional pesto contains only 5 ingredients.  Fresh basil is ground up with pine nuts, garlic, a little bit of coarse salt, and some Parmesan cheese.  Sometimes olive oil is added to improve the consistency.  The ratios of various ingredients may change (the Internet is full of “secret recipes” for the “perfect” pesto), but the basic method remains the same.  Put it all together in a food processor, blend until smooth, and serve over noodles or spread on fresh bread (or add it to other dishes).

I’m not actually a particular fan of pine nuts, and so I tend to make the less-well-known French version: pistou.  Pistou is even simpler to prepare, being prepared only with basil, garlic, salt, and olive oil.  Sometimes cheese is added, but I prefer to leave it out — I’ll generally add cheese to the dish later, if I want it.  Pistou goes extremely well with goat cheese, feta, Swiss cheese, or just a simple Canadian cheddar.

The ratio that I use in preparing my pistou is:

  • 2 cups roughly chopped fresh basil
  • 8 to 10 cloves fresh garlic
  • 1/3 to 1/2 cup olive oil
  • 1 tsp coarse sea salt (you can leave the salt out if you’re looking to monitor the sodium in your diet, but remember to add a touch of salt in later if you’re going to be using it on its own or in a dish that doesn’t already contain salt, as this does enhance and round out the flavour).

Start with a smaller amount of olive oil, and add more as things are blending if you find that the food processor is having trouble integrating it all into a paste.  I find that the amount of oil used can vary quite a bit, depending on factors like the moisture content of the basil and the humidity of the air.  The final result should be about 1 to 1-1/4 cups of fragrant, delicious pistou, ready to be used as-is (it’s delicious spread on fresh bread), or combined into other things.  Store your pistou in an airtight container, and it should keep in the fridge for a month, or freeze it in an ice-cube tray and then keep frozen (in a ziplock bag, to prevent freezer burn) for up to three months.

Ideas for using your pistou include:

  • Add a tablespoon of pistou and some grated cheese to warm pasta for a delicious, quick lunch or dinner.
  • Alternatively, make a pasta salad by adding pistou and fresh lemon juice to cold cooked noodles.
  • Add a tablespoon or two worth of pistou to cream or cheese sauces for extra zing
  • Put a teaspoon of pistou inside a stuffed chicken breast with bacon, asparagus and asiago cheese for something fancy and delicious — this is a meal I use when I really want to impress somebody, as most people get really excited about food-stuffed-inside-other-food.
  • Add a bit of pistou to a creamy risotto dish for extra flavour.
  • A scoop of pistou in a vegetable or chicken soup adds a nice hit of flavour and some pretty green flecks (this is a very traditional way of using pistou in Provence; pistou soup is usually prepared with summer vegetables and spaghetti noodles)
  • A tablespoon of pistou, a tablespoon of whole-grain mustard, a splash of lemon juice, and a cup of olive oil (well-shaken) makes an easy and delicious salad dressing.
  • Add a generous amount of pistou to some sour cream, cream cheese, or greek yogurt  to make a yummy dip.
  • Add pistou to a hummus spread for a non-traditional flavour.

Accidental Awesome: Marshmallow Pie Recipe

Posted in Recipes with tags , , , , , , , , , , , , , on February 28, 2011 by KarenElizabeth

I’ve been experimenting with sponge cakes lately.  I love how light and fluffy they are, just from the eggs having been thoroughly whipped before use.

On Friday I made this delicious lemon poppyseed cake, with a sweet lemon glaze.  It came out beautifully, and I ate three servings in a single sitting because it tasted so great.  I’ll definitely be making this one again, and I’ve saved the recipe for future reference.

Only downside was, I was left with 8 egg whites and no plan for how to use them.  Not really a problem, though — I knew I was going to have people coming over on Sunday for our weekly D&D game, and figured that I could whip up a quick batch of meringues.  Tasty, crowd-friendly, and it would be a great way to use up those leftovers.

I’ve mentioned before on this blog that meringue is kind of my cooking nemesis.  No matter how careful I am to get *no* yolk or oil in there, no matter how long I whip the eggs, about 50% of the time it just simply doesn’t work.  The eggs get frothy and fluffy, but don’t turn into a nice, stiff meringue.  But with all the sponge cakes lately, I was starting to get more confident in my dubious meringueing (yes, it’s a word, I’ve just coined it) skills.  The last few times I’ve whipped egg whites for a sponge cake, they’ve fluffed up nicely, and I let myself be lulled into thinking that perhaps I’d finally found the knack.

Nope.  10 minutes of whipping, and *nothing* was happening.  My friends were due to arrive soon, and I was now without a delicious dessert to finish off the meal.

So, I scrounged around the kitchen.  My gluten-free friend was on the guest list for the night, so I couldn’t just throw in some cake flour and turn it into a sponge cake.  But I *did* have some rice flour and tapioca flour in the cabinet.  A little more sugar, a generous splash of amaretto, some cinnamon, and a thorough mixing.  In the end, this is what the recipe ended up looking like:

  • 8 egg whites
  • 1-1/4 cup + 2 tbsp white sugar
  • pinch of salt
  • 1/2 tsp vanilla extract
  • 1/4 cup amaretto
  • 1/2 cup rice flour
  • 1/2 cup tapioca flour
  • 1 tsp cinnamon

Preheat the oven to 300 degrees Fahrenheit.  Whip the egg whites with 2 tbsp sugar until very frothy.  Stop when you just begin to see soft peaks forming.  Add the 1-1/4 cup sugar, the vanilla extract, the amaretto, and the pinch of salt, and blend thoroughly.  Fold in the rice flour, tapioca flour and cinnamon.  Pour the batter into a well-greased 8-inch springform pan or bundt pan.  Bake for 30 minutes, then turn the oven off.  Leave it in the oven while the oven cools down — by slowing the cooling process, you lessen the chances that your pie will shrink and crack while cooling.

For visual interest, dust the pie with cinnamon before serving.

This pie has the texture of a giant marshmallow, and tastes kind of like if Cinnamon Toast Crunch cereal had a baby with a unicorn.  It is quite possibly my favourite cooking experiment EVER, and it all came from screwing up meringue.

My friends have suggested alternative ways of making this (although Kenneth stresses that the original is absolutely delicious all on its own and needs no tampering).  The addition of chocolate or caramel topping, the addition of a graham-cracker crust, and the substitution of other alcohols (especially Bailey’s Irish Cream) instead of the amaretto — all of these ideas have been tabled, and will likely be tried in their turn.  If you have other suggestions, please feel free to share them — and let me know if you try this recipe yourself, and what you think of it!

I will make this again next week and remember to take pictures this time (didn’t think of it until after we’d devoured the whole thing, unfortunately).  Next time I think I’ll try a chocolate fudge drizzle on the top, because I can’t resist adding chocolate to this.

Recipe: Traditional-ish Black Forest Cake

Posted in Recipes with tags , , , , , , , , on February 23, 2011 by KarenElizabeth

My sister’s birthday is in February, and her request this year was for a Black Forest cake.  I was happy to oblige, but ran into a few problems with finding a recipe that would be something close to the Black Forest cakes we remembered from childhood.  Most of the ones I was able to find online called for boxed cake mix, canned cherry pie filling, and (gag!) Cool Whip topping instead of real whipped cream.  In other cases there were debates over what makes a “traditional” Black Forest cake — what sort of cake to use, whether or not to put kirsch (cherry brandy) in the whipped cream for flavoring, whether to use jam for the filling or a more gooey, pie-filling-like substance … it was all a little overwhelming.  Finally I gave up the search and just emailed my mom, to ask if she had a good recipe.  She got back to me with two: one from a book of traditional Ontario immigrant recipes, and another from a family friend who spent some time living in Germany.  I combined the best elements of both, and came up with something that I was very happy with.

My sister approved, too, as you can see.

Making the Cake

For the cake portion, I used the recipe from mom’s book of traditional recipes.  It’s a chocolate sponge cake, which I felt would better hold up to being soaked with cherry brandy.  It’s not as moist as some other cakes, but if you apply the brandy properly (read: use lots!) that’s really not an issue at all.  The ingredients are as follows:

  • 4 eggs, separated (the recipe calls for small, but I used medium because my grocery store doesn’t carry small)
  • 4 tbsp warm water
  • 2/3 cups sugar
  • 1 tsp vanilla extract
  • 1-1/2 tsp almond extract
  • 1/4 tsp cinnamon
  • pinch of salt
  • 3/4 cup all purpose flour
  • 1/3 cup corn starch
  • 3 tbsp cocoa
  • 2 tsp baking powder
  • 2 tsp sugar

Preheat the oven to 325 degrees Fahrenheit, and prepare an 8-inch springform pan or two 8-inch round pans (if using round pans, I suggest lining them with parchment paper to make it easier to lift the cake out afterwards).

Separate the eggs so that the whites are in one mixing bowl, and the yolks are in another.  To the yolks, add the warm water, and whisk until foamy.  Add the 2/3rds cup sugar, vanilla and almond extracts, cinnamon, and salt.  Whisk together for a couple of minutes, until everything is thoroughly combined and there are lots of little bubbles in the mix.

Using an electric mixer or whisk that is clean and free of any oil (this is important!), whip the egg whites until they are foamy.  Sprinkle in the 2tsp of sugar, and continue to beat the eggs until stiff peaks form.  Remember: the fluffier you can get the eggs to be, the fluffier the finished cake will be!

Gently fold the egg whites into the yolk mix, then sift the flour, cornstarch, cocoa, and baking powder over top and fold in.  Mix very gently until the mixture is just barely blended together — overmixing will pop all those little bubbles you worked so hard to make in the eggs.

Pour the batter into the pan(s), and bake for 30 minutes (slightly less if using two pans — they’ll cook faster if they’re thinner).  A toothpick inserted into the center of the cake should come out clean.

Once the cake has cooled down a little bit, you can slice it in half (or into 3 layers, if you’re feeling adventurous).  A piece of unwaxed dental floss works well for cutting — just saw it back and forth and work your way patiently through the cake.  Once the cake is cut into layers, you can add the cherry brandy — sprinkle it on a little bit at a time, until the cake is fully saturated.

Let the cake sit and cool down completely while you prepare the cherry filling and whipped cream.

Making the Cherry Filling

Since it’s February, I had to buy frozen sour cherries — fresh just aren’t available right now.  Frozen are preferable over canned, since they don’t have anything added to them, but if canned are all you can get, then just work with what’s available.  In a pinch you can resort to pre-made canned cherry pie filling, but homemade always tastes better.

This is the same filling that I use for making cherry pies, but I only made a half-sized batch, as you don’t really need a whole pie’s worth of filling for this cake.  Double this recipe if you want to make a pie with it.

  • 2 cups sour cherries, pitted and drained (reserve 1/2 cup of the liquid)
  • 1/2 cup sugar
  • 1/6 cup flour
  • dash of salt
  • 1 tbsp butter
  • 1/8 tsp almond extract

In a saucepan, combine the 1/2 cup of cherry juice with the sugar, flour and salt.  Bring this mixture to a boil, stirring constantly.  Continuing to stir, reduce the heat, and simmer for 5 minutes.  Remove the pan from the heat, add the butter and almond extract, and then add the cherries.

Cool this mixture down completely before using it on your cake, or it will melt the whipped cream.

Making the Whipped Cream

Whipped cream is easy stuff to make from scratch, and I always prefer the homemade stuff to the stuff that comes in a can.  When making a black forest cake, you ALWAYS want to do your whipped cream from scratch, because a) you can add cherry brandy to the whipped cream for flavour, and b) you can add a pinch of gelatin or cream of tartar to stiffen the cream and stop it from gooshing out between the cake layers.

Combine a cup of whipping cream with a teaspoon of sugar, a splash of cherry brandy, and a pinch of unflavored gelatin or cream of tartar.  Whisk or beat with an electric mixer until stiff peaks form.

Putting it All Together

Once the cake and cherry pie filling have cooled completely, you can assemble your black forest cake.  You can use either two or three layers of cake — three looks fancier, but otherwise it makes little difference.

With two layers, you’ll want to put both cherry pie filling AND whipped cream between the layers.  With three, you’ve got an option: you can either put cherries in one of the spaces and whipped cream in the other, or use a combination in both.  You might need to make a bit of extra whipped cream, if you choose the latter, but avoid the temptation to overfill: you want this to taste like cake, not like whipped cream with occasional bits of cake in it.

Once your layers are stacked up, coat the entire cake in the remaining whipped cream.  Shave two squares of semi-sweet chocolate using a cheese grater, and pat these chocolate shavings onto the sides and top of the cake, leaving a ring of white around the top edge.  Place maraschino cherries around the top edge (I like to use one per slice).  Store the cake (covered) in the fridge until serving, so that the whipped cream won’t get droopy.

And enjoy!  Black forest cake is a little bit labour-intensive to make, but it’s definitely worth the work.  Nom-nom-nom.  Delicious.

All in One Pot: Pasta with From-Scratch Cream Sauce

Posted in Recipes with tags , , , , , , , , , on February 1, 2011 by KarenElizabeth

My most hated of all household chores isn’t cleaning the bathroom.  It’s not scrubbing the floors.  It’s not washing the ceilings, or doing the laundry, or any of the other things which many people will state when they complain about housework.

No, my least favourite household chore is the dishes.

For someone who cooks almost every single meal from scratch, this can quickly grow to become a problem.  Without the disposable containers of take-out and pre-packaged meals, it’s hard to make anything that doesn’t create at least a small pile of dishes to be done.  A pot for this, a pan for that, a bowl and a set of tongs and a spatula … and if, like me, you’re prone to letting the dishes go for a couple of days before rolling up your sleeves and getting to it, it can become a pretty daunting task.

It’s at times like this when I am thankful for meals that can be made using only one pot, one spoon, a cutting board, and the dish you serve it in (if you’re feeling especially lazy, you can even eat it right out of the pot and save yourself one more dish).  But, contrary to popular belief, one-pot meals need not consist of foods like ramen noodles, condensed soups, and Kraft Dinner.  You can make something classy enough that you’d serve it to company (probably *not* right out of the pot, though), and still keep your dishes to a bare minimum.

Tonight’s dinner is a creamy pasta with chicken, carrots, onions and mushrooms, and I’m making enough for 2 servings (mmm, leftovers for lunch tomorrow!).  You can increase the amounts you’re using to make more — none of the measurements are particularly exact.

I began by cooking up a bone-in chicken breast (you can use boneless if you prefer, but bone-in is less expensive to buy).  I put a couple inches of water in the bottom of my pot (about 2 cups worth), added the chicken breast, put the lid on, and simmered until the chicken was thoroughly cooked.  When cooking in water you don’t need to worry about overcooking, because the meat’s not going to dry out on you.  Just keep an eye to make sure the water doesn’t all evaporate away, because you don’t want your meat getting stuck to the bottom of the pot and burnt.

Once the meat is thoroughly cooked, remove it from the pot and set it aside to cool down enough that you can handle it.  While you’re waiting, begin working on the sauce.  Add about a quarter cup of cornstarch to the water still in the pot, and whisk until it’s dissolved.  This will help to absorb any fat from the chicken and keep your sauce from separating, and will also help the sauce to thicken up and become creamy.  Add another cup or so of water, and about a half-cup of half-and-half cream.  Your sauce will be quite thin at this point, but that’s okay — it’s going to simmer down during the cooking, and some will be absorbed by the pasta later.

You can also add some spices at this point — a bay leaf or two, some poultry seasoning, garlic powder, rosemary, black pepper, whatever catches your fancy.  Get creative if you wish; an Indian masala spice blend makes a really nice sauce, or you can use some paprika and chili powder to make a spicy, more colourful dish.  Be a little bit conservative when adding spices here — the sauce will thicken up and the flavours will concentrate during cooking, and you don’t want to accidentally over-spice.  It’s easy to add more later, but can be difficult to compensate for having put in too much.  Definitely don’t add any salt until the end, as it’s very easy to over-salt a dish at this point.

Chop up half of a cooking onion, two small (or one large) carrots, a handful of mushrooms, and your chicken breast (remove the bones and discard them).  Use other vegetables if you would like to, but these things make a nice, balanced mix.  Put it all into the pot, return it to a simmer, and let it cook until the veggies have all softened up.

Once everything is thoroughly cooked, you can add your pasta noodles, as well as any soft items (green onions, kale, etc) that only need a few minutes to cook.  Watch the pot and stir things around occasionally to stop the noodles from sticking to the bottom.  Once the noodles are soft, give the sauce a taste to see if it’s spiced well enough for you.  If it all tastes good, it’s ready to eat!


Make it Gluten-Free!

This same technique works well for cooking rice (or rice noodles), and so is excellent for people who are trying to go gluten-free.  Using gluten-free pasta or rice in place of the normal pasta noodles makes an easy dish, with none of the gluten or wheat products often found in commercially prepared sauces.


Some Other Ideas, and Troubleshooting

You can also do other types of sauce in this same way — try making a tomato sauce by adding half a small can of tomato paste instead of the cream, or try an Asian-inspired sauce with sake or white wine and a tablespoonful of soy sauce — this is especially nice with rice.  You can use other meats in place of the chicken (lean sausage or ground beef works excellently), just avoid fatty cuts as they will make the sauce a bit greasy.

If you find that your sauce is a bit too thin, simmer it a bit longer and/or add a bit more corn starch.  If it’s too thick, just stir in a little more water.

And that’s all there is to it!  A delicious homemade meal, without the big pile of dishes.