Archive for sweet

Gluten-Free, Vegan-Friendly Shortbread Cookie Bars

Posted in Recipes with tags , , , , , , , , , on December 2, 2013 by KarenElizabeth

Dinner parties at my house can be a little bit challenging, as I have a few friends with very restrictive dietary needs.  In most cases, I simply end up preparing a variety of dishes, making sure that each guest has at least something available for them to eat.  But on occasion I’ll try to make a dish that’s for everyone — and that’s where a creation like this one comes in.


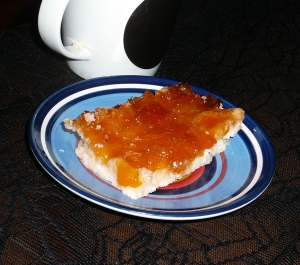
P1070892

It’s gluten-free, so my 2 friends with gluten intolerances can eat it.  It has no coconut, no peanuts, no eggs, no soy, and no dairy.  It’s vegan.  And (this is important), it’s still delicious.


The Ingredients

  • 1 cup vegetable shortening
  • 1 cup sugar
  • 1/2 tsp vanilla extract
  • 1 shot of your favourite liquor or liqueur (I used brandy)
  • 1-1/2 cups rice flour
  • 1/2 cup tapioca starch
  • 1 tsp salt
  • 1/2 tsp baking powder (check to make sure it’s gluten-free; most are)
  • 1/2 cup to 3/4 cup of your favourite type of jam (I used apricot) for topping


The Prep

Preheat your oven to 350 F, and line an 8 x 12 baking pan with parchment paper (this is important because sticky, baked-on jam is very, very annoying to clean up).

In a mixing bowl, cream together the sugar and shortening.

Add the rest of the wet ingredients (except for the jam) & mix well.

Add the dry ingredients (adding in 2 stages is recommended to prevent rice flour from “poofing” everywhere while you stir).  No need to worry about overmixing, since this is gluten-free: just try to get a nice, even texture.  The resulting dough will be very soft and crumbly.

** Note – if you want to make your shortbread into individual cookies or shapes, refrigerate it for 30 minutes to make the dough a little bit easier to work with.  For cookie bars, though, this is unnecessary.

Press the dough into the bottom of your baking pan to create an even layer.

Spread jam over the top.

Bake for 30-40 minutes in the middle of the oven.  The cookie bars are done when you start to get some delicious-looking caramelization at the edges of the jam layer.

When you first take the cookies out of the oven, they will be VERY soft.  Use a butter knife to divide them into bars, then pop the whole thing into the fridge or freezer to cool down before attempting to remove them from the pan.  Once the tapioca flour sets up, they’ll be a nice, slightly-crumbly shortbread texture, but until then they’ll be a bit of a fall-aparty mess.


Variations

To change it up a bit, try adding nuts or a streusel topping on top of the jam layer, or drizzle melted dark chocolate over the finished cookie bars.

To make easy, round cookies instead of bars, try using a muffin tin (or mini-muffin tins) — press a bit of dough into the bottom of each, then top with jam.  Paper muffin-liners will help with preventing any sticking.

To make a thicker, layered bar, try using an 8 x 8 pan instead of an 8 x 12, and divide the dough in half.  Press half into the bottom, top with jam, then add the other half of the dough, and  top with more jam.  Increase the cooking time by a few minutes to ensure even cooking.
Accidental Awesome: Marshmallow Pie Recipe

Posted in Recipes with tags , , , , , , , , , , , , , on February 28, 2011 by KarenElizabeth

I’ve been experimenting with sponge cakes lately.  I love how light and fluffy they are, just from the eggs having been thoroughly whipped before use.

On Friday I made this delicious lemon poppyseed cake, with a sweet lemon glaze.  It came out beautifully, and I ate three servings in a single sitting because it tasted so great.  I’ll definitely be making this one again, and I’ve saved the recipe for future reference.

Only downside was, I was left with 8 egg whites and no plan for how to use them.  Not really a problem, though — I knew I was going to have people coming over on Sunday for our weekly D&D game, and figured that I could whip up a quick batch of meringues.  Tasty, crowd-friendly, and it would be a great way to use up those leftovers.

I’ve mentioned before on this blog that meringue is kind of my cooking nemesis.  No matter how careful I am to get *no* yolk or oil in there, no matter how long I whip the eggs, about 50% of the time it just simply doesn’t work.  The eggs get frothy and fluffy, but don’t turn into a nice, stiff meringue.  But with all the sponge cakes lately, I was starting to get more confident in my dubious meringueing (yes, it’s a word, I’ve just coined it) skills.  The last few times I’ve whipped egg whites for a sponge cake, they’ve fluffed up nicely, and I let myself be lulled into thinking that perhaps I’d finally found the knack.

Nope.  10 minutes of whipping, and *nothing* was happening.  My friends were due to arrive soon, and I was now without a delicious dessert to finish off the meal.

So, I scrounged around the kitchen.  My gluten-free friend was on the guest list for the night, so I couldn’t just throw in some cake flour and turn it into a sponge cake.  But I *did* have some rice flour and tapioca flour in the cabinet.  A little more sugar, a generous splash of amaretto, some cinnamon, and a thorough mixing.  In the end, this is what the recipe ended up looking like:

  • 8 egg whites
  • 1-1/4 cup + 2 tbsp white sugar
  • pinch of salt
  • 1/2 tsp vanilla extract
  • 1/4 cup amaretto
  • 1/2 cup rice flour
  • 1/2 cup tapioca flour
  • 1 tsp cinnamon

Preheat the oven to 300 degrees Fahrenheit.  Whip the egg whites with 2 tbsp sugar until very frothy.  Stop when you just begin to see soft peaks forming.  Add the 1-1/4 cup sugar, the vanilla extract, the amaretto, and the pinch of salt, and blend thoroughly.  Fold in the rice flour, tapioca flour and cinnamon.  Pour the batter into a well-greased 8-inch springform pan or bundt pan.  Bake for 30 minutes, then turn the oven off.  Leave it in the oven while the oven cools down — by slowing the cooling process, you lessen the chances that your pie will shrink and crack while cooling.

For visual interest, dust the pie with cinnamon before serving.

This pie has the texture of a giant marshmallow, and tastes kind of like if Cinnamon Toast Crunch cereal had a baby with a unicorn.  It is quite possibly my favourite cooking experiment EVER, and it all came from screwing up meringue.

My friends have suggested alternative ways of making this (although Kenneth stresses that the original is absolutely delicious all on its own and needs no tampering).  The addition of chocolate or caramel topping, the addition of a graham-cracker crust, and the substitution of other alcohols (especially Bailey’s Irish Cream) instead of the amaretto — all of these ideas have been tabled, and will likely be tried in their turn.  If you have other suggestions, please feel free to share them — and let me know if you try this recipe yourself, and what you think of it!

I will make this again next week and remember to take pictures this time (didn’t think of it until after we’d devoured the whole thing, unfortunately).  Next time I think I’ll try a chocolate fudge drizzle on the top, because I can’t resist adding chocolate to this.

Peanut Butter Cookie Brownies

Posted in Recipes with tags , , , , , , , , on March 22, 2010 by KarenElizabeth

So last night I came up against an age old dilemma:  would I rather have peanut butter cookies, or brownies?  Kenneth solved the problem for me by suggesting that I create a combination peanut butter cookie/brownie confection.  And it turned out so well that I’m going to share it with you!

The Cookie Crust

You can use any recipe for the cookie crust that you like — just make sure it’s a soft and easily formed dough.  I chose to go simply with the old Skippy-jar 3-ingredient standby, and adjusted the usual recipe so that it would only make enough to cover a 9×9 pan.  You could, of course, make more cookie dough and just freeze the rest for later (or make cookies AND cookie-brownies all at once, if you’re feeling daring).  But since I’m going to be moving to a new apartment soon, I’m trying to reduce the amount of frozen goodness in my freezer.

So for my cookie crust, I just combined 1 cup of peanut butter, 1/2 a cup of white sugar, and 1 egg.  Pressed into the bottom of a 9×9 pan, this made for a crust about 1-1/2cm (1/2 inch) thick.  I suggest poking some divots into the top of the cookie with a fork to help the brownie batter adhere during baking.

Set your cookie crust aside while you prepare the brownie batter.

The Brownie Batter

As with the cookie crust, you could probably get away with using any brownie recipe that you like for the brownie portion of this delicious snack — but I highly suggest trying this one.  It’s from my mom’s Betty Crocker Cookbook, and it’s actually the very first recipe that I ever made all by myself (well, I was 5, so dad handled putting it into the oven, but I did all the measuring and stirring).  I’ve made it many different ways over the years, but I keep coming back to the original.

  • 1 cup white sugar
  • 1/2 cup butter or margarine (softened)
  • 1 tsp vanilla
  • 2 eggs
  • 2/3 cup all purpose flour
  • 1/2 cup cocoa
  • 1/2 tsp baking powder
  • 1/2 tsp salt
  • 1/2 cup walnuts (optional; or you could use other nuts)

Preheat your oven to 350 degrees Fahrenheit.  Cream together the sugar and butter, then add the vanilla and the eggs.  Stir in the flour, cocoa, baking powder and salt.  Finally, fold in the nuts (if you’re using them — you can also try chocolate chips, mini marshmallows, or dried fruit).

Once your brownie batter is prepared, spread it in an even layer over top of the cookie crust.  Then it’s into the oven for about 50 minutes (this is about 10-15 minutes longer than the brownies would take alone, but the cookie crust adds some time).  A pick inserted in the center of the pan should come out clean when the brownies are finished.

Tips and Tricks

You’ll definitely want to let your cookie/brownies cool pretty thoroughly before you attempt to remove any from the pan.  The cookie crust needs some time to solidify, or else it’s just going to come out in a whole lot of little pieces.

I think that next time I make these, I’m going to sprinkle the top of the brownies with mini marshmallows before baking.  That way, they’ll be kind of like peanut butter s’more brownies.  I’m also considering making a chocolate chip cookie brownie, with chocolate chip cookie dough in place of the peanut butter cookie dough.

Let me know if you come up with your own variations!