Archive for vegan

Gluten-Free, Vegan-Friendly Shortbread Cookie Bars

Posted in Recipes with tags , , , , , , , , , on December 2, 2013 by KarenElizabeth

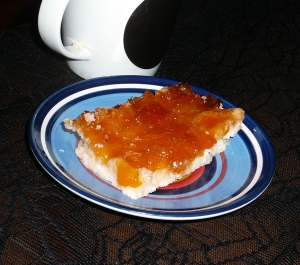
Dinner parties at my house can be a little bit challenging, as I have a few friends with very restrictive dietary needs.  In most cases, I simply end up preparing a variety of dishes, making sure that each guest has at least something available for them to eat.  But on occasion I’ll try to make a dish that’s for everyone — and that’s where a creation like this one comes in.


P1070892

It’s gluten-free, so my 2 friends with gluten intolerances can eat it.  It has no coconut, no peanuts, no eggs, no soy, and no dairy.  It’s vegan.  And (this is important), it’s still delicious.


The Ingredients

  • 1 cup vegetable shortening
  • 1 cup sugar
  • 1/2 tsp vanilla extract
  • 1 shot of your favourite liquor or liqueur (I used brandy)
  • 1-1/2 cups rice flour
  • 1/2 cup tapioca starch
  • 1 tsp salt
  • 1/2 tsp baking powder (check to make sure it’s gluten-free; most are)
  • 1/2 cup to 3/4 cup of your favourite type of jam (I used apricot) for topping


The Prep

Preheat your oven to 350 F, and line an 8 x 12 baking pan with parchment paper (this is important because sticky, baked-on jam is very, very annoying to clean up).

In a mixing bowl, cream together the sugar and shortening.

Add the rest of the wet ingredients (except for the jam) & mix well.

Add the dry ingredients (adding in 2 stages is recommended to prevent rice flour from “poofing” everywhere while you stir).  No need to worry about overmixing, since this is gluten-free: just try to get a nice, even texture.  The resulting dough will be very soft and crumbly.

** Note – if you want to make your shortbread into individual cookies or shapes, refrigerate it for 30 minutes to make the dough a little bit easier to work with.  For cookie bars, though, this is unnecessary.

Press the dough into the bottom of your baking pan to create an even layer.

Spread jam over the top.

Bake for 30-40 minutes in the middle of the oven.  The cookie bars are done when you start to get some delicious-looking caramelization at the edges of the jam layer.

When you first take the cookies out of the oven, they will be VERY soft.  Use a butter knife to divide them into bars, then pop the whole thing into the fridge or freezer to cool down before attempting to remove them from the pan.  Once the tapioca flour sets up, they’ll be a nice, slightly-crumbly shortbread texture, but until then they’ll be a bit of a fall-aparty mess.


Variations

To change it up a bit, try adding nuts or a streusel topping on top of the jam layer, or drizzle melted dark chocolate over the finished cookie bars.

To make easy, round cookies instead of bars, try using a muffin tin (or mini-muffin tins) — press a bit of dough into the bottom of each, then top with jam.  Paper muffin-liners will help with preventing any sticking.

To make a thicker, layered bar, try using an 8 x 8 pan instead of an 8 x 12, and divide the dough in half.  Press half into the bottom, top with jam, then add the other half of the dough, and  top with more jam.  Increase the cooking time by a few minutes to ensure even cooking.
Recipes: Creamy Broccoli & Cheddar Soup

Posted in Recipes with tags , , , , , , , , , on March 17, 2013 by KarenElizabeth

This soup is a favourite food of mine — and it’s incredibly easy to make.  If you’re intimidated by cream soups, or just don’t tend to like the commercially available ones (I know I don’t — I find they’re always way too thick & the texture is off-putting), this is a great place to start.  You can use this same basic method to make any sort of cream soup — cream of mushroom, cream of celery, whatever catches your fancy.

You can also make this soup lactose-free and vegan-friendly by omitting the cream & cheese — it’s a delicious soup without those things, too.

Broccoli_bunches

Total prep time is about an hour and a half, although most of that is just cooking.  The actual work involved takes about 10-15 minutes.

Ingredients

  • 1 bunch broccoli, roughly chopped
  • 1 cup half and half cream (can be omitted or replaced with soy milk for lactose-free)
  • 3 cups stock (chicken or vegetable)
  • 3 cups water
  • 1 onion, diced
  • 3 or 4 cloves garlic, finely minced
  • a few tablespoons butter or margarine
  • 1/2 cup flour (or a flour substitute like corn starch, if going for gluten-free)
  • salt & pepper to taste
  • a pinch of paprika
  • cheddar or other cheese (I happen to like mixing 1/2 and 1/2 cheddar and swiss) (can be omitted if desired)

Prep

Start by pre-heating a large pot and melting your butter or margarine over medium-high heat.  Add your diced onion & garlic, and sautee until you start getting some nice brown colour going on (should just take a couple of minutes).  At this point, add your flour — this will absorb the butter and the liquid from the onions to make a roux, which will thicken your soup.  Keep stirring until all the liquid is absorbed, so that the flour doesn’t burn & stick to the bottom of the pot.

Add your stock & 3 cups of water to the pot, as well as your broccoli.  You can add a bit more water if the broccoli is not completely submerged.  Bring everything to a boil, and then turn down the heat to a very low level and let it simmer until the broccoli is thoroughly cooked & quite soft.

At this point you want to blend your soup to crush up the broccoli.  If you have an immersion blender, this is the perfect tool — or if not, you can pour your soup into a blender or food processor, and then return it to the pot once blended.  I like to only blend a little, to leave some chunks of broccoli and give the soup a better texture, but you can make it as creamy as you wish.

Once everything is blended together, add your cream & spices.  Careful with the salt, especially if you used a commercially made stock as your base — go lightly, and you can always add more later.  Remember that you’ll be adding cheese to this, and cheese has salt in it too.  Pepper, on the other hand, I encourage using a heavy hand with.  Paprika rounds out the flavour and compliments the garlic, as well as adding a little pop of colour (you can also sprinkle the bowl with paprika before serving, to add extra visual interest).

Return the soup to a simmer, and leave for 20 minutes or longer (to thoroughly merge all of the flavours).

Grated cheese should be added to the bowl right before serving — this means that the cheese will still be visible when the bowl hits the table, and also means that you don’t end up with cheesey goo stuck permanently to the bottom of your pot (makes for easier washing up).

And that’s all there is to it!

Changing it Up

This soup is super easy, so don’t be afraid to change it up with your own touches and ingredients.  Switch up the vegetables, or add meat to the pot (after you’re done blending things) for a heartier meal — I like adding bits of chicken or sausage (cooked in a frying pan with a bit of oil to give them some nice browned edges), or you can’t go wrong with bacon.  Try different types of cheese to add a different flavour (smoked gouda is delicious, or a creamy goat cheese for richness).  Try adding curry when you’re making your roux (curry likes to be cooked with oil, or it tastes “raw”), or a blend of Italian spices when you add your cream.  Or add some roasted tomatoes and/or red peppers to give it a really different flavour and colour.  Be adventurous!  And share your experimentations in the comments.