Archive for pie crust

Recipes: Quiche, a Basic How-To

Posted in Recipes with tags , , , , , , , , , , , , , , , , on January 2, 2014 by KarenElizabeth

When I was in university, I made my first vegetarian friends — and I had no idea how to feed them.  My high-school girlfriend’s brief flirtation with vegetarianism had consisted mostly of grocery-store-brand veggie lasagna, vegetarian chili-cheese fries at the cafeteria, and eating a lot of raw veggies & dip.  I’d never had to cook an entrée that didn’t include meat, before, and wasn’t entirely sure where to begin.

A search online for vegetarian recipe ideas led me to a food I’d never tried before:  quiche.  I figured that something which looked essentially like an omelette in a pie crust couldn’t possibly be half bad, and whipped up a quick version with broccoli, mushrooms, and three kinds of cheese.  It was a success, and quiche entered my cooking arsenal as an easy, quick, and crowd-pleasing piece of comfort food.

quiche

These days, while quiche remains an easy default for vegetarian-friendly meals, it’s something I make more often as a portable lunch-option for work, or as something I can quickly reheat when I’m too busy to cook for a few days.  It’s also a great way of using up leftovers, since you can throw pretty much anything into a quiche and it’ll come out tasting pretty good.  I usually do, in fact, use meat in my quiches — today’s version includes pork sausage — but they’re an incredibly flexible food that you can easily tailor to your particular desires.


The Crust

The most labour-intensive part of a quiche is the crust.  I generally use my basic pie crust recipe as the starting point, but since a quiche doesn’t require a top crust I’ll just whip up a half-sized batch.

Cut a half-cup of vegetable shortening into 1-1/3 cups all-purpose flour and a pinch of salt, until you’ve got a crumbly mixture with no big clumps of shortening.  At this point, since quiche is a savoury dish, you may want to add a few herbs — I like to toss in a sprinkling of dried Italian herbs for visual interest and a bit of a flavour-hit in the crust.  Sprinkle cold water in, a tablespoon at a time, until the dough just comes together into a slightly-crumbly ball.  Refrigerate the dough for 15 minutes or so before rolling out into the bottom of your pie dish (or a round cake pan will do, if you want a deeper quiche with a more straight up-and-down edge — a springform pan will allow you to make a deep-dish quiche without the difficulty of removing it at the end).

Alternatively, you can either use a store-bought crust, or puff pastry.  Either is perfectly acceptable (although everyone should really make a scratch-made crust at some point in their life).


The Filling

As I’ve already mentioned, you can put pretty much anything you like into a quiche.  Meat should be pre-cooked (for today’s quiche, I browned the sausage & some onions in a frying pan for the filling), but vegetables can be either cooked or raw — I tend to prefer raw veggies, since they retain more of their individual flavour and texture within the cooked quiche.  Frozen veggies are perfectly acceptable, here — just give them a rinse to get rid of the “freezer taste”.  Dark green veggies like broccoli, asparagus, and spinach are classic quiche ingredients, but don’t feel limited; use whatever you like.

Leftovers are a great option for quiche, so this is the perfect place to use up the last bits from your roast or chicken dinner.

Depending on the texture you prefer, you can use large or small pieces in your filling.  I like the texture & flavour variations provided by using larger pieces of veggies, but it’s entirely up to you.  Smaller bits will give a more uniform flavour throughout the dish.

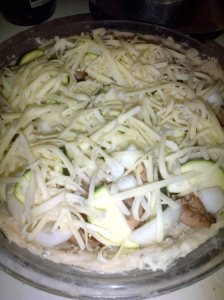
quiche filling

Where I differ from many classic quiche recipes is that I like there to be a LOT of stuff in my quiche.  While custard is delicious, I prefer to add just barely enough egg & cream to hold the whole thing together, to make a more hearty meal.  So as you can see in the photo, I fill my dish right up.  Meat, veggies, and plenty of cheese, with just a few little spaces in-between for the egg to fill.  Putting the majority of the cheese on top (use any kind you like; my quiche today has a combination of Parmesan and sharp Cheddar) makes for a nice toasted, crispy top that both looks and tastes delightful.


The Custard

The defining ingredient of quiche is, of course, the custard.  Thoroughly beating the eggs is important to getting a nice, fluffy texture on your finished product.  For my 9″ pie pan, I use 3 eggs and about a cup of cream (5-10%, although whole milk will do if you’re concerned about fat content).  Add your herbs & spices to your custard — salt, pepper, garlic powder, and paprika (be generous with the paprika) are my usual “basic” mix, and then I’ll add other spices to compliment whatever filling I’m using.  Chili spice or cayenne for a spicier meal, parsley & sage to go with chicken, rosemary with beef, dill & thyme with fish — or, like today, a generous scoop of curry powder to compliment my pork sausage.  Make sure the herbs & spices are thoroughly mixed in, then pour your custard mix slowly over top of the filling in the pie shell.  A few light taps on the side of the pie pan will make sure that the custard has filled up all the holes between the filling.

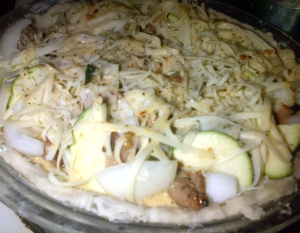
quiche before baking

Note that your quiche should not look particularly “full” of custard at this point.  It will puff up during cooking — if the pie pan is full to the brim, you’ll get spillover as things cook.  You can see in the pictures that mine looks quite “shy” before going in the oven, but once things are cooked the eggs have puffed up to fill the remaining space.

Cooking, Serving, Storing, and Re-Heating

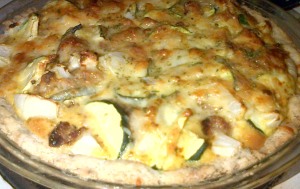
In an oven heated to 375 Fahrenheit, bake your quiche for about 40 minutes (until the crust is golden-brown).  Once you take it out, let it sit for 5 minutes or so before serving — this will let the custard solidify a bit more, and make it easier to slice & serve.

quiche toasty cheese

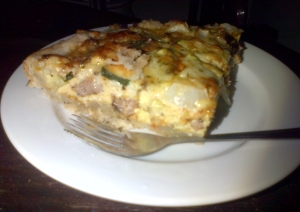
I like my quiche with a bit of hot sauce on top, or occasionally a drizzle of balsamic vinegar.  If you’re feeling decadent, you can drizzle on a bit of hollandaise.  A 9″ pie pan makes about 4 servings.  A bit of salad on the side rounds out the meal, but certainly isn’t necessary.

Quiche will keep wonderfully for 3-4 days in the fridge — wrap tightly with plastic wrap or aluminum foil, or store in an airtight container, to prevent it from drying out.  Or you can divide it into portions & freeze for 2-3 months.

Reheating is best done in an oven or toaster oven, to maintain the crisp & flaky crust.  If you’ve frozen your quiche, reheat it directly from frozen, don’t thaw it out first.  If you’ve just been keeping it in the fridge, it should only take about 10 minutes to be heated through & ready to eat.

Microwaving is faster, but your crust will get soggy.  3-5 minutes should do, depending on your particular microwave.

You can also eat quiche without reheating, which is often what I’ll do at lunch time.
Recipe: Strawberry Rhubarb Pie with Easy Lattice Crust

Posted in Recipes with tags , , , , , on June 15, 2010 by KarenElizabeth

Pie is one of my favourite things to bake, so it always surprises me a little when I hear that people are afraid to take the plunge and try making their own pies from scratch.  Crust seems to be the main sticking point, and many otherwise capable bakers will succumb to evil temptations and use (shudder) store-bought pie crusts for their creations.  Besides being more expensive than scratch-made pie crusts, store-bought pastry tends to come out heavier and less flaky than the real thing.  It also tends to be loaded up with preservatives and other unnecessary nonsense.

So cast aside your fears, I’ve prepared for you a little step-by-step tutorial on making an easy, delicious pie crust … from scratch.  I even took pictures along the way.

Preparing the Crust

This particular pie crust recipe is the first one that I ever attempted on my own (many, many years ago when I still had to stand on a stool to reach the counter), and I find that it’s a really good standby for most sweet pies.  It’s not my favourite for savoury pies, but it does get the job done in a pinch.  Best of all, it only uses a few ingredients, and takes very few steps to prepare.

To begin, measure out 1 cup vegetable shortening and 2 and 2/3rds cups all purpose flour into a large mixing bowl.  Add to this a pinch of salt, then grab two butterknives.  Holding one knife in each hand, cut repeatedly in opposite directions across the bowl.  Your objective is to cut the shortening into the flour (rather than stirring) — this is what will provide that lovely, flaky texture at the end of things.

You’re finished cutting when the largest chunks of shortening are about pea-sized, and the whole mixture looks crumbly, like so:

At this point it’s time to start adding water.  You want to use cold water, so the shortening doesn’t melt, and add it a tablespoon at a time.  Depending on the temperature and humidity in your kitchen, you’ll probably end up using 6-8 tablespoons of water in total.  Use a fork to lightly “toss” the water in, rather than mushing everything together with a spoon.  You’ve got enough water when the mixture looks kind of raggedy, and there aren’t any dry crumbs floating around the bottom of the bowl, like so:

Now all that’s left to do is to gather your dough into a ball (handle it as little as possible to prevent melting the shortening), cover, and pop it into the refrigerator for 20 minutes or so while you prepare the filling.  Cold pie crust is easier to roll out later.

Preparing the Strawberry Rhubarb Filling

This is my grandmother’s recipe, so none of the measurements are particularly exact.  You can use equal amounts strawberry and rhubarb, or more of one and less of the other.  You can add more or less sugar to get a sweeter or more tart pie.  You can even use different berries besides strawberries (raspberry rhubarb is pretty darn delicious), or simply do a 100% rhubarb pie.  It’s all up to you.

In general, here’s what I use:

  • 4 cups rhubarb, washed and chopped into bite-sized pieces
  • 2 cups strawberries, washed and chopped
  • 3 eggs
  • 1 cup sugar
  • 1/4 cup flour
  • pinch of cinnamon

Mix this all together in a large bowl, and let sit for 5-10 minutes.  This lets some of the juice come out of the fruit, so that you can judge how juicy your pie is going to be.  If you wind up with a lot of juice sloshing around in your mixing bowl, you can leave some of it out when you add the filling to the crust — this will prevent the pie spilling over and making a mess of your oven.

Putting it All Together

Take your dough ball out of the fridge and divide it in half.  Return half to the fridge so that it can stay cool for now.  On a well-floured surface (I like to use my large wooden cutting board, but you can just use the counter if you prefer), roll out the bottom crust of the pie to about 1/4″ thick.  Make sure it’s about 1″ wider than your pie plate on all sides.

Getting your pie crust into the pie plate without tearing it can be a bit of a tricky business.  Having your crust well-chilled before rolling it out definitely helps.  If you rolled your crust out on a cutting board or pastry board, you can simply set your pie plate on top of the crust, upside-down, then flip the whole thing (board and all) right-side-up in one smooth, swift motion.  If you don’t have a large cutting board, the easiest method I’ve found is to use your rolling pin.  Fold the crust gently over top of the rolling pin, then lift it carefully over top of the pie plate.

If, despite your best efforts, you end up with a hole or two in your pie crust, just use a bit of milk or cream to “glue” the crust back together, and press it into place with your fingers.  Once the pie is baked, nobody will be able to tell the difference.

Pour your pie filling into the bottom crust, then retrieve the remaining half of the dough from the fridge.  You can just roll out a top crust the same way you did the bottom, and lift it carefully on top of the pie with your rolling pin, but I prefer to get a little bit fancy here and do a lattice crust.  It’s very little extra effort, and always seems to be appreciated by the pie-eaters (especially those who aren’t aware of just how easy this is).

Before you put your top crust on, you’ll want to cut up about 2tbsp of cold butter or margarine into small chunks, and sprinkle these around the surface of the pie.  This will melt and meld with the filling during baking.

To create a lattice crust, roll the dough out to about 1/4″ thick, at least as wide as the pie plate, then cut into strips 1/2″ to 1″ wide.  Take the two longest strips and lay them across the top of the pie in an X, thusly:

Then add more strips in an over/under pattern.  Leave little gaps between the strips so that your filling will show through and look all pretty.  Here’s a few shots of my lattice crust in progress:

Once you’ve got the whole top of the pie evenly covered, tear off the excess crust from the edges.  You’ll end up with a ragged looking edge:

Which I like to roll up so that it looks more clean and finished:

Finally, I like to brush the crust with a little bit of milk or egg wash, and sprinkle white sugar over the top to create a nice bit of texture and colour.

Pop your pie into a 425 degree oven for about 40 minutes, until the crust turns all nice and goldeny-brown.  Let cool, and enjoy the deliciousness.

Leftover Crust

You’ll probably have a bit of leftover crust after making the lattice top.  Pop this into a freezer bag and it will keep in the freezer for a couple of months.  Small amounts of crust are great for making a quick batch of tarts.  Or you can just roll the crust out to about 1/4″ thick, dip in egg wash, sprinkle with cinnamon and sugar, and make yourself some little cookies (they’re great with coffee).